Leftovers-racer Research Archives

This information contains posts related to the racing jeep we call “Leftovers”

To Top

Racer Update

• CATEGORIES: Builds, Features • TAGS: This site contains affiliate links for which I may be compensated.

Once the water got fixed (found a retired local plumber who still does small jobs and did previous work on our house, so that worked great), I returned to the cage.

The front “loops” have been bent and added, along with a top and mid cross bar. I also added one side bar, with the other almost ready to spot-weld in place. Unfortunately, I ran out of materials, so I need to get a couple more tubes.

As you can see below, I found a seat placement I like. My head rests just below the top of the seat, so plenty of room for a helmet. Now, I just have to figure out how I want to mount them. I was going to weld in the seat frames, but I think I am going to bolt them. This will make it 1) easier to install the floor pan and 2) allow me to change up the seats/position if I’m unhappy with how it feels.

2023-01-29-racer-rollcage-lores-3 2023-01-29-racer-rollcage-lores-2 2023-01-29-racer-rollcage1

 
To Top

Two Bars Forward, One Backward, and A Leak

• CATEGORIES: Features • TAGS: This site contains affiliate links for which I may be compensated.

A couple days ago I bent the front passenger side loop. All was well until the very last (bottom) bend. For the passenger side it would have been okay where it is, but for the driver’s side I felt the bar would be better if it angled more quickly once under the dash so it gave more clearance for the clutch foot.

So, after much hemming and hawing, I bent the driver’s side differently. That turned out better, which meant redoing the passenger side.

You can see a comparison of them below. It’s tough to visualize where the floor/firewall will be, but the sheet metal gives a rough idea.

2023-01-27-racer-cage

Once I get the passenger loop done, the remaining bars ought to be completed more quickly.

However, before I could do that Thursday night we discovered a leak underneath the bathroom of our master bedroom. Ugh. We don’t know when it actually broke, but Thursday night, we could hear a strange noise in the bathroom. Of course, we were about ready for bed, which meant getting re-dressed and dropping into our crawl space where I shut off the water to our house. Friday morning I crawled the length of the house, where I discovered where the water was falling on the plastic. The actual break was in the insulation, but I didn’t locate it. I’d rather get a pro to deal with it.

So, we are house-camping again. On the upside, we tried out the shower in our shop for the first time. It turns out, it works great!

We have a plumber (highly recommended and the uncle of our neighbor) coming tomorrow to look at it, as I’d rather not work with the copper pipe. I want to get it done quickly and get it done right … I got a cage to finish!

 
To Top

More Cage Progress

• CATEGORIES: Features • TAGS: This site contains affiliate links for which I may be compensated.

On Sunday, I was able to tack together the basic structure of the rear portion of the cage. On Monday, I began work on the front portion.

Here’s a look a the back portion with the body sitting on the frame:

2023-01-23-racer-work-cage3 2023-01-23-racer-work-cage2 2023-01-23-racer-work-cage1

There are still a number of small things to do to complete the rear portion (such as adding rear shock mounts, adding some corner supports, and, of course, welding all the connection points).

To properly calculate the two long side bars, which will run from the mid part of the frame back to the rear loop, I needed the body to be sitting on the frame.

Each side bar has four bends, so getting them both the same is a good challenge.

After LOTS of measurements, angle considerations, and design thoughts, I finally got around to bending the two most difficult angles on the side bar. Below you can see the passenger side bar temporarily in position, though the lower two bends haven’t been finished yet (next bend will direct the bar vertically at the dash, then the final bend will redirect the bar forward under the dash where it will attach to a still-to-be-added cross bar.

Unfortunately, I didn’t get as far as I’d hoped, because Ann had a bad migraine, so I had to take the dogs to the groomers (which they needed pretty badly, as bad weather forced us to cancel two previous appts over the past two months).

2023-01-23-racer-work-cage4 2023-01-23-racer-work-cage6 2023-01-23-racer-work-cage5

I expect that by Friday I’ll have all the bars bent, positioned, and maybe even welded.

 
To Top

More Progress, Despite The Great Cow Escape

• CATEGORIES: Features • TAGS: This site contains affiliate links for which I may be compensated.
2023-01-20-cows-escape

Bad cows …

I had big plans to work out early and get out to the shop. But, just as I finished my lifting, our neighbor Andrew texted me at 7:30am, “I got a text from my neighbor Dan Green. Your cows are in his pasture.”

Ugh. There went my early start in the shop.

We piled on clothes (below freezing this morning), loaded up the UTV, and headed over to Andrew’s fence line (the cows have been borrowing Andrew’s pasture). Sure enough, the cows had created a nice wide entrance in the wire fence.

The moment the cows heard our UTV, they recognized it was feeding time, so we lured six of them back to Andrews pasture. Of course, one dumb cow, our 7mo steer, couldn’t figure out how to get back through the fence, so, of course, he went over another part of the non-barbed wire fence, damaging it. Ugh.

Once at Andrew’s pasture, we wooed them over to our pasture with food and closed the access gate to Andrew’s place. With the cows grounded, we went to work on the fence.

2023-01-20-cows-escape2

Thankfully, it didn’t take too long to fix the fence. I.believe our two mischievous 2yo steers (they become meat next month) were leaning over the fence to get some tall grass in Dan Green’s pasture, which caused the fence to collapse. Bad cows.

Now for the cage progress. I’ll skip the explanation (am tired) and just get straight to the pics. The big loop is completed, along with the back bars and the rear cross bar. Everything is, level, square, tacked-in-place, and ready for more bars.

There will be no work on Friday (quick trip to Seattle), but I plan to get back to it this weekend. I’ll add more bars for strength, then begin work on the front loop.

2023-01-20-racing-jeep-cage2

2023-01-20-racing-jeep-cage1


To Top

Getting the Bends (Correct)

• CATEGORIES: Features • TAGS: This site contains affiliate links for which I may be compensated.

More-months-than-I-care-to-think-about ago (about seven months I think), I bought a cheap Affordable Bender. When it arrived, I was less than impressed with the collar (see this post). So, I called them, only to learn that the collar was designed that way and should work fine (I believe they told me “Billions” of bends have been done with Affordable Benders, or something like that).

So, I decided to test the bender before sending it back; I hadn’t expected to wait 7 months to test it!

Yesterday, I mounted it to my metal work table and tested it with a 90 degree bend, one of two I need for the racer’s main loop (it’s the most difficult bend of the entire roll cage). The bender comes with a 90 degree die, so I was a little worried wether the bender would do a 90 degree bend.

First off, it didn’t take me long to miss my old bender, the one I built from plans: http://www.ewillys.com/2009/10/08/my-tube-bender-almost-done/. But, since I couldn’t access my plan (lock PDF with no password and the author of the PDF wouldn’t answer my emails), I had to buy this AFF bender.

Here are the results of the 90 degree bend .. as you can see, it stops short of a 90 degree bend:

2023-01-17-racer-rollcage1

Ugh .. what It meant is that I had to force the 15′ tube through the collar a few inches so I could add an additional bend. While that worked, I bent it too far (I misread my level .. it went to 90 degrees which I missed, then started down to 88, so I thought it was at 88 and needed to go to 90. UGH .. had to start over).

Eventually, I got the hang of how to do a 90 degree bend with this and managed to create the loop below.

This pic shows the first 90 finished and I’m starting on the second.

2023-01-17-racer-rollcage4

This shows the second 90 done. That is all the 90s I need, so the rest of the bends should be much easier.

2023-01-17-racer-rollcage5

I still have two more bends on this loop (the bars are parallel, though don’t look that way in the pics), which I’ll complete tomorrow.

2023-01-17-racer-rollcage6


To Top

Racer Update

• CATEGORIES: Features • TAGS: This site contains affiliate links for which I may be compensated.

I’ve spent parts of the last couple of days thinking through how/where the new cage will attach, how the floor should attach, and how the body should attach and where it should sit. For example, the body must be far enough forward so that the solid front clip can slip over the front of the radiator, but back far enough to sit in the right area in the back.

My initial intention was to bolt the cage fo the frame, but this frame (already cut and spread 5″) has enough mods that if I’m at a point that the cage has to be removed to make changes, I’m better off starting with a new frame (and, at this point, I don’t want to do a ground up rebuild).

Additionally, the body has warped some, so I will need to build a jig out of wood so that I can try to straighten the body some (apparently, using a heat gun, I should be able to remove some of the warping. What I can’t re-straighten, I will use fiberglass and/or some (probably) aluminum plates placed strategically to make it look straighter.

Here’s a couple pics of the body. You may not be able to tell, but both sides of the front of the body have flexed outward. So, between the heat gun, the jig, some interior plating, and the use of strategic mounts, I should be able to make it look a little less out of whack.

2023-01-15-racer1 2023-01-15-racer2

Over the next week we are supposed to have (finally) dry weather and temps that will be in the high 40s and low 50s, so I hope to get the cage built and, maybe, the body cleaned up to ready for some fiberglass repair and, eventually, some paint.

Though I dislike the neon green chassis, Ann has acquired a taste for it, so I might start with the body painted black, similar to the narrow body that was on it.

 
To Top

Back to the Racer

• CATEGORIES: Builds, Features • TAGS: This site contains affiliate links for which I may be compensated.

After an unexpected detour of 6 months, I finally had a chance to return to working on the racer.

My first project was to create the side bars by reusing the 2 1/2″ side bars from the yellow racer. You can see them mounted on the old racer here (my finger is accidentally pointing out the driver’s sidebar in this pic). I cut both of them off this chassis.

2022-05-31-parkette-body-disassembled-interior1

Here is a side view of the old chassis. These sidebars are angled upward to attach at the angled portion of the frame near the engine mounts. I liked the look of them, so figured I’d reuse them. At this point, I also plan to build the new racer cage similar to what you see blow, but with a few changes.

2022-05-31-parkette-body-disassembled-cage5

Somehow, I managed not to take many pics of this process, but I started with my new metal saw by cutting the side bars so they’d sit flat (I removed the sidebars from the other chassis with a sawz-it-all, so the cuts weren’t great).

Trying to get this angle just right on the front portion of the bars was tricky. So, I cut the back bar first to the optimal length, then dropped the front of the bar over the edge of the table until the tube was level. Then used the flat edge of a carpenter square to draw a straight edge on the bar.

2023-01-08-racer-build7

Here, the cut has been finished.

2023-01-08-racer-build8

Next, I welded plates to each tube end. Then, I clamped the tubes to the sides of the frame. With that done, Ann and I put the body in place to make sure it fit over the angled side bar, which it does.

2023-01-08-racer-build6Here’s a view from the back:
2023-01-08-racer-build9

Since it looks like things will fit correctly, I will pull the body back off, pull the side bars off, clean off the paint where I need to weld on the frame, and attach the sidebars.

Next, I’ll spend some time determining how the floor, cage, firewall, and the seats will mount, and how the side of the body will attach to the cage (the body sides are weak rather flimsy, so it needs a good mounting system).

 
To Top

Racer Work Resumes…

• CATEGORIES: Features • TAGS: This site contains affiliate links for which I may be compensated.

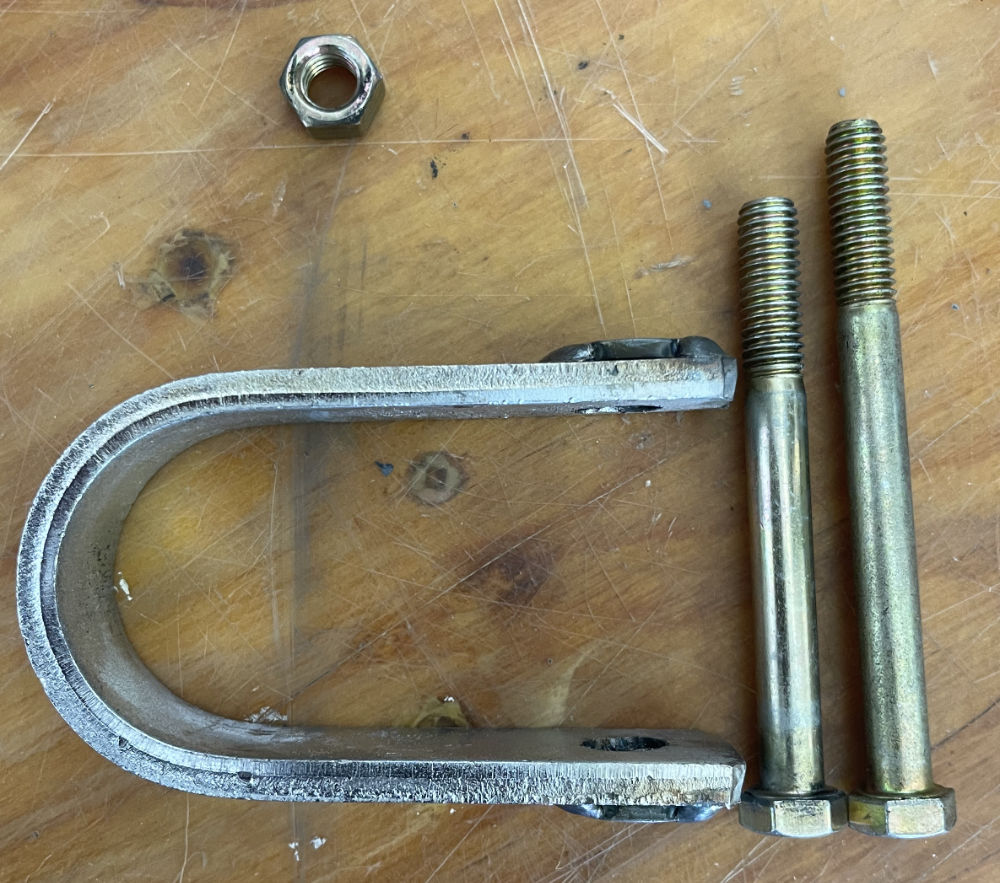
UPDATE: Today I removed the tube bender from its box, only to find that the collar for the tube bender had irregular holes that had been “patched” by welding two spacers to the outside of it. But, that modification meant that the bolt was no long enough, meaning one of the two sides of the collar would be riding over the threads. Given the importance of the collar, this “fix” is unacceptable, so this bender will get returned.

Below you can see that both holes are irregular, so a spacer has been welded to the outside. What are these people thinking? 
affordable-bender-collar2 affordable-bender-collar1

affordable-bender-collar3

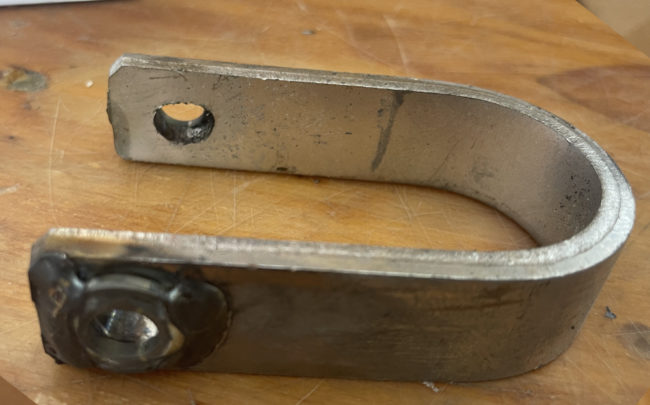
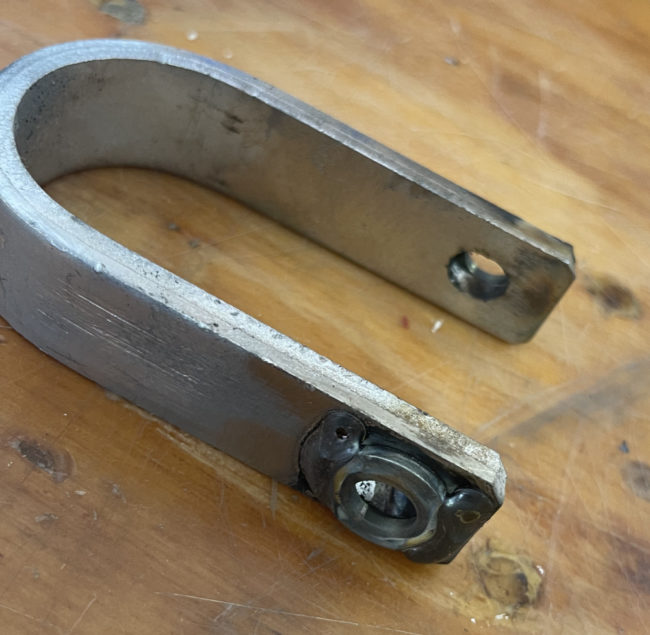
The bolt next to the collar is the stock bolt. I happened to have a similar bolt that was longer and better for this application. However, given the poor quality collar, I will be returning this device.

============================

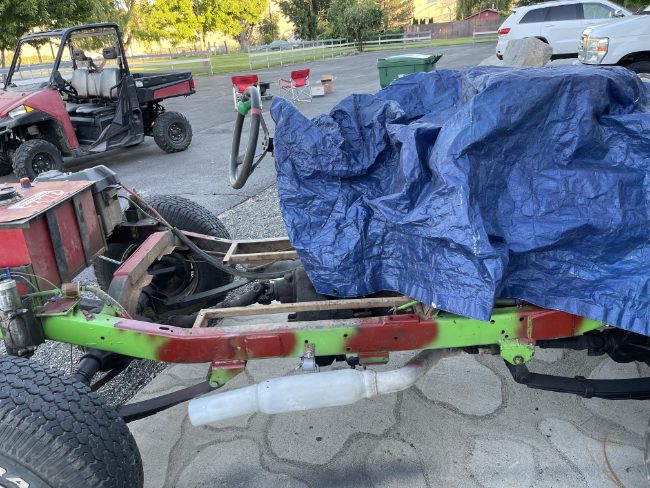
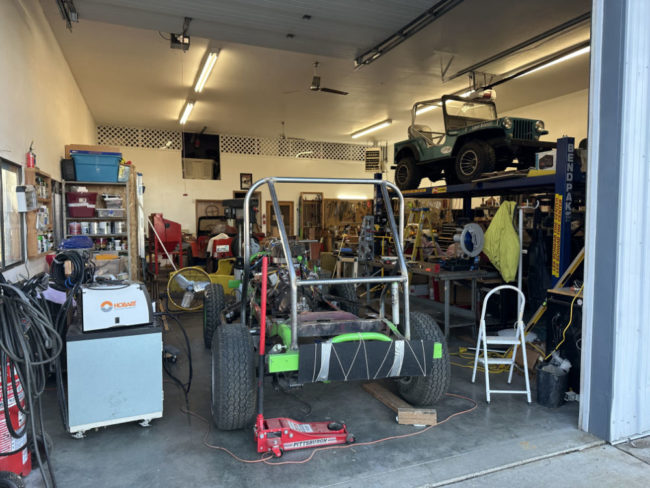
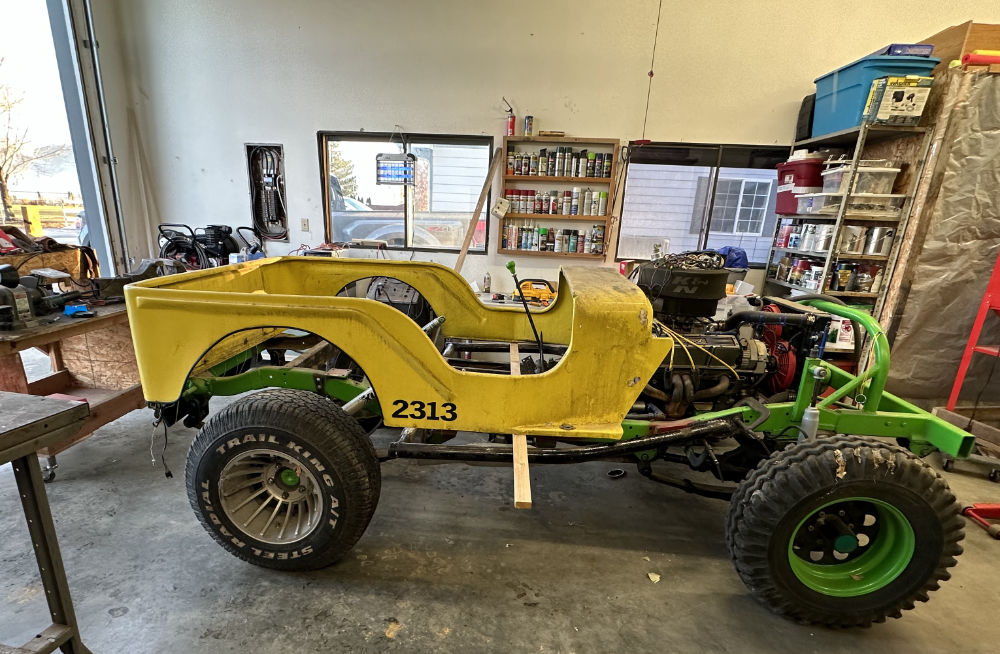
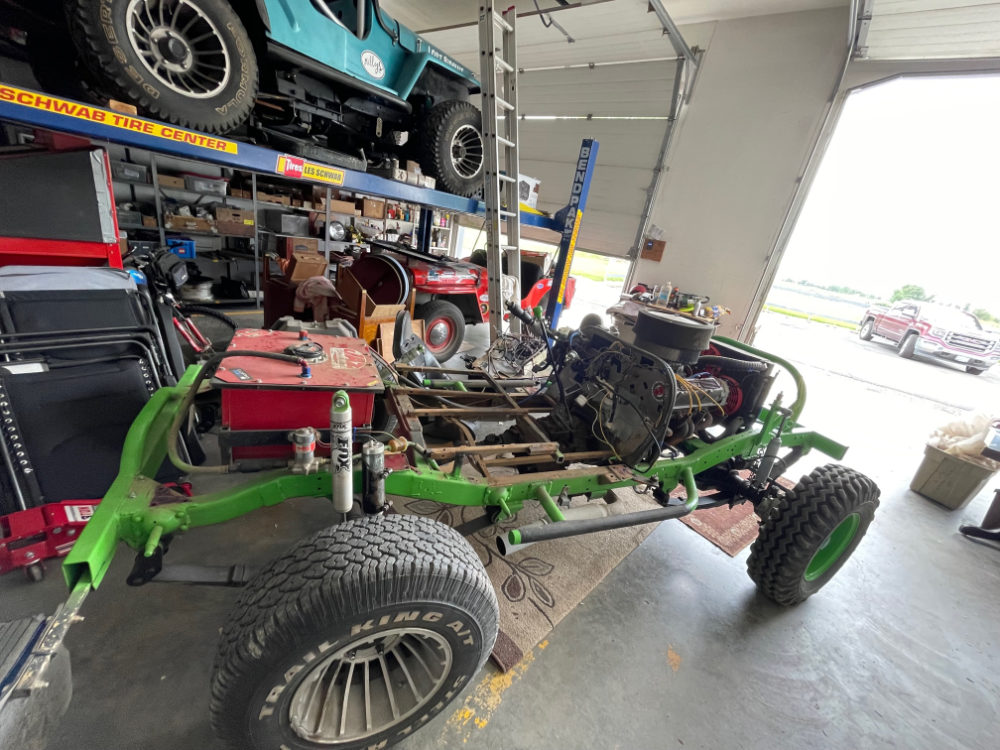
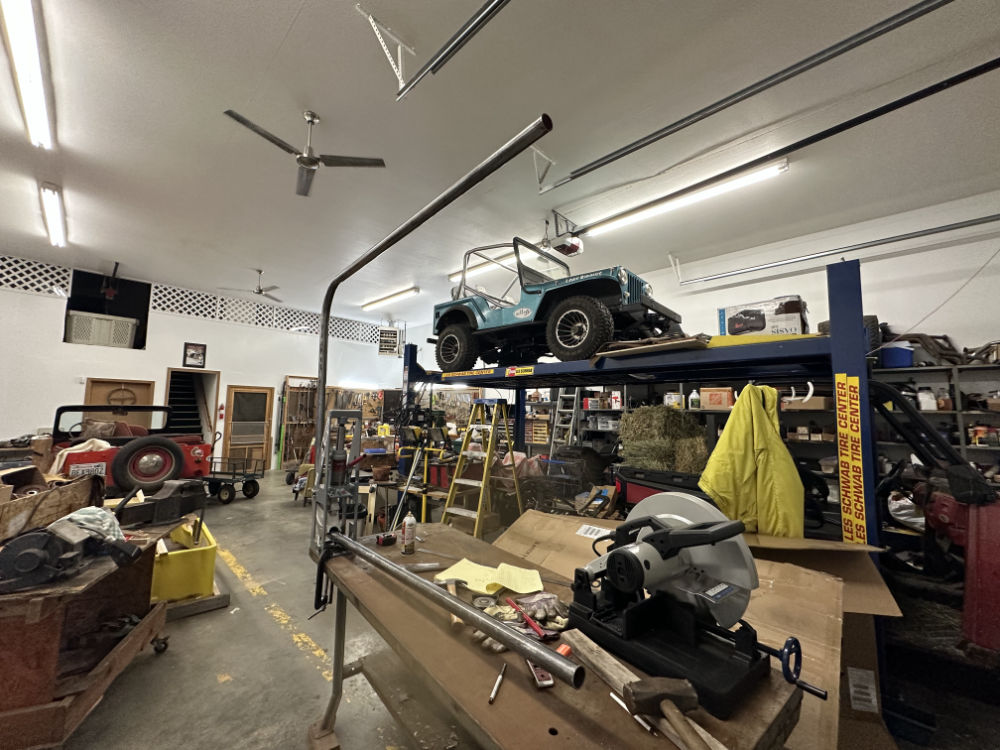
As mentioned, a couple weeks ago we had the estate sale, which consumed WAY too much of my time. First there was the setup. Then, there was the rain, so then we had to re-setup using part of the shop (which meant moving stuff out of the shop like the race jeep), hanging tarps to hide tools, etc. In the end, the rain stopped Saturday at 4am and began Sunday at 3pm, which gave us a decent window to sell stuff.

We sold or gave away quite a bit, but there were still multiple trips to donation centers, a trip to recycling, and several trips to the dump. Then, once completed, we still had to reorganize the remainder.

The good news is that a lot of crap left the shop, which gives me much more room than I’ve had. Also. good news, the weather has finally warmed up, with blue sky and no rain.

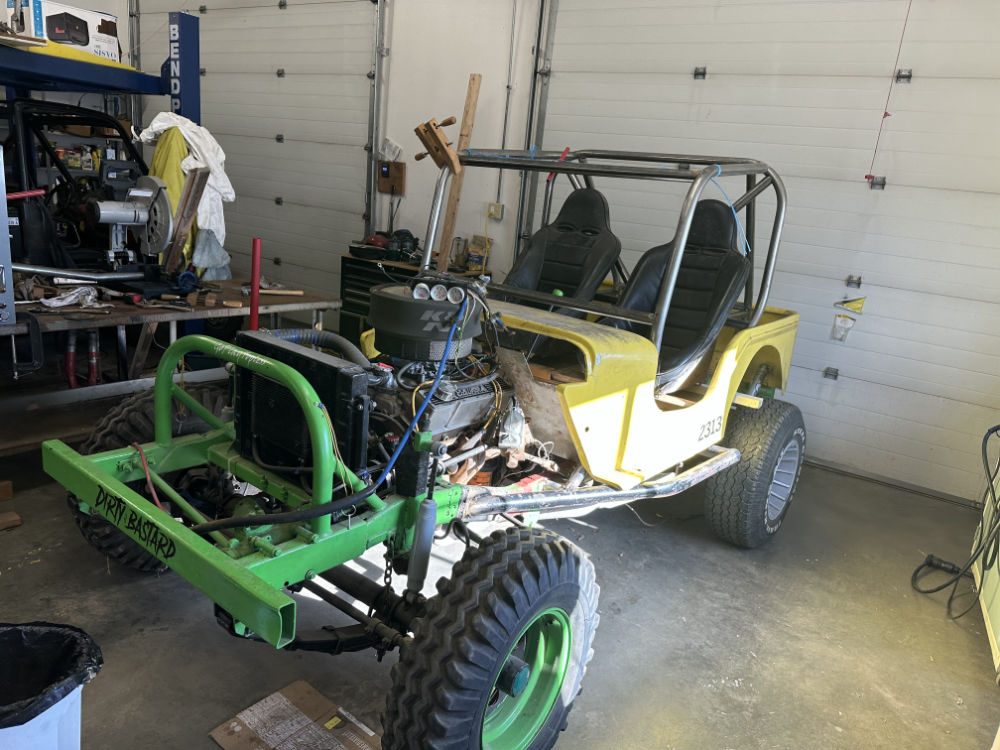
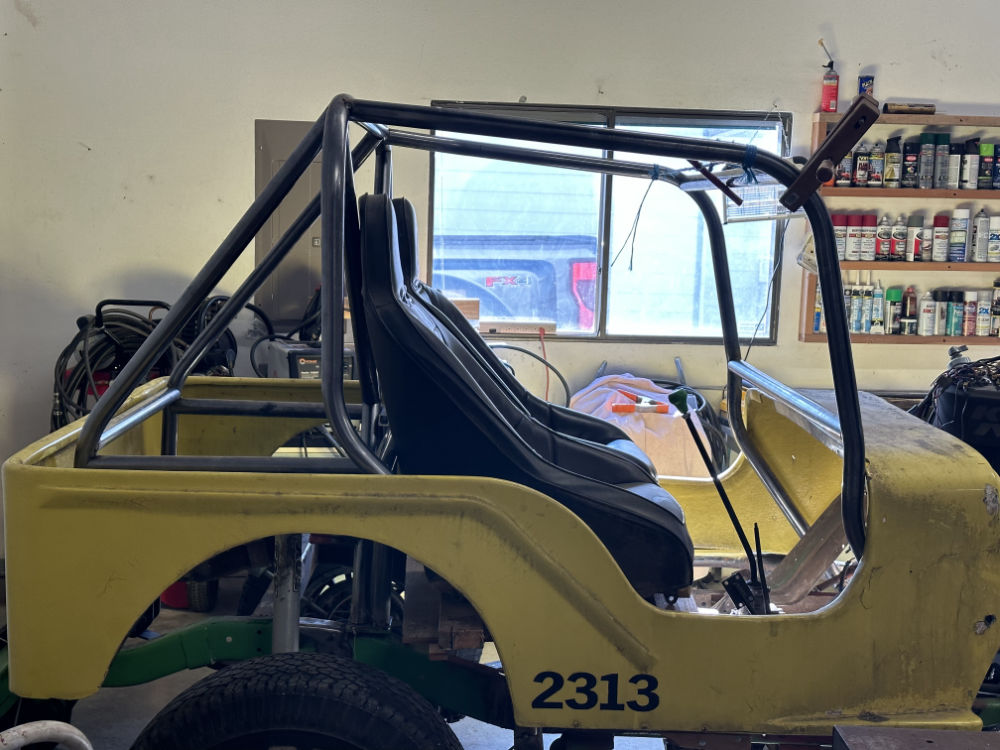
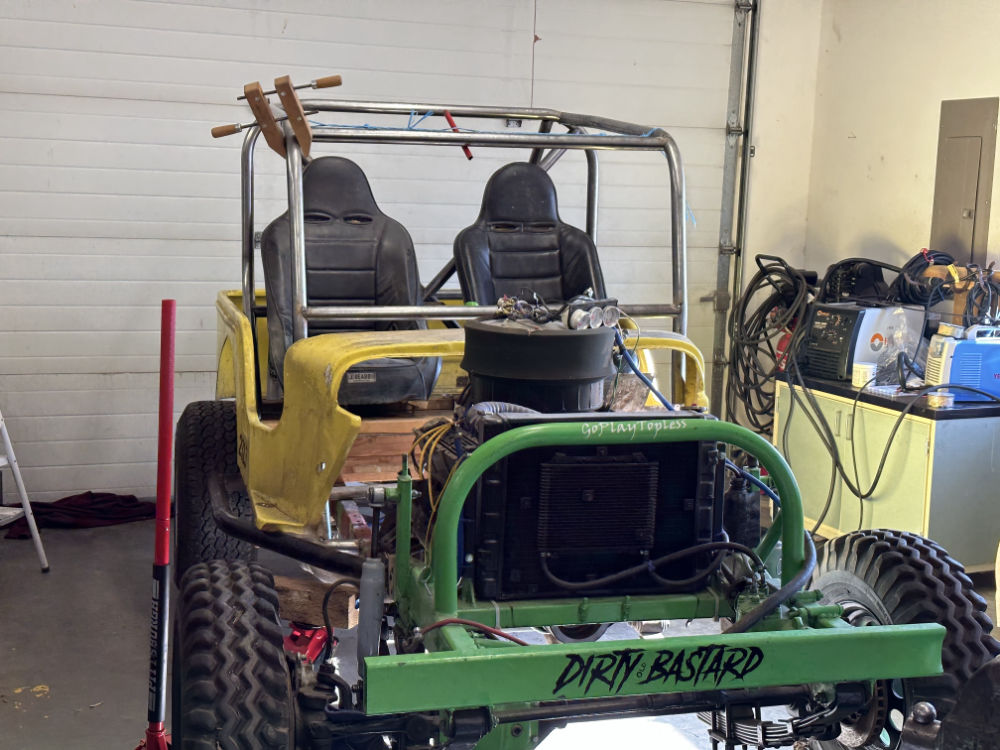
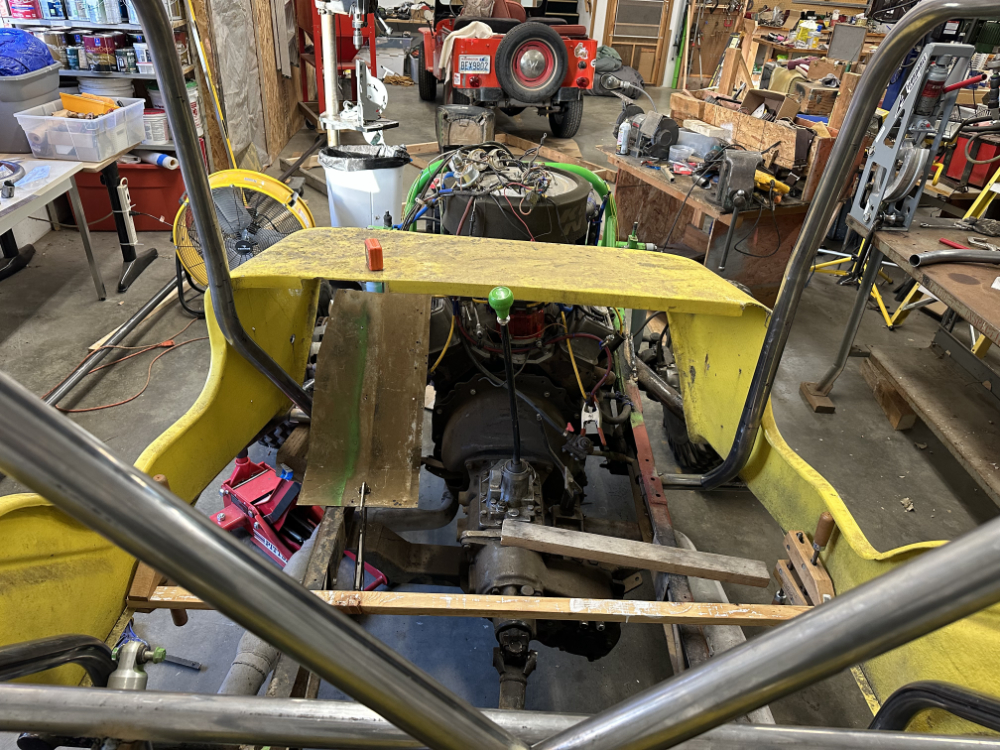
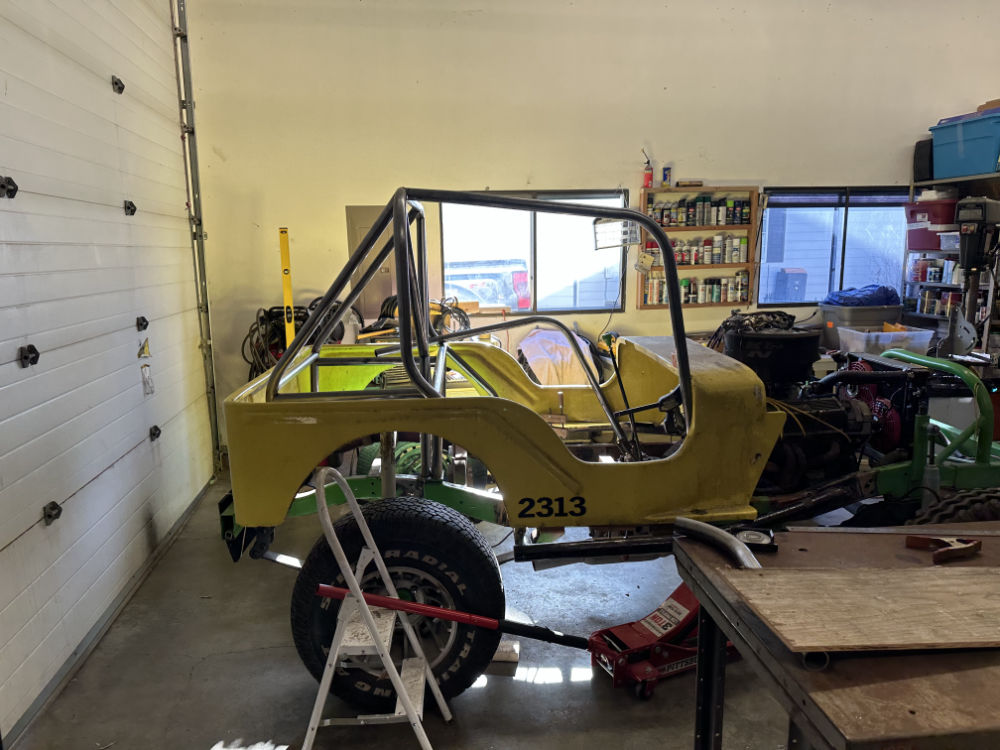
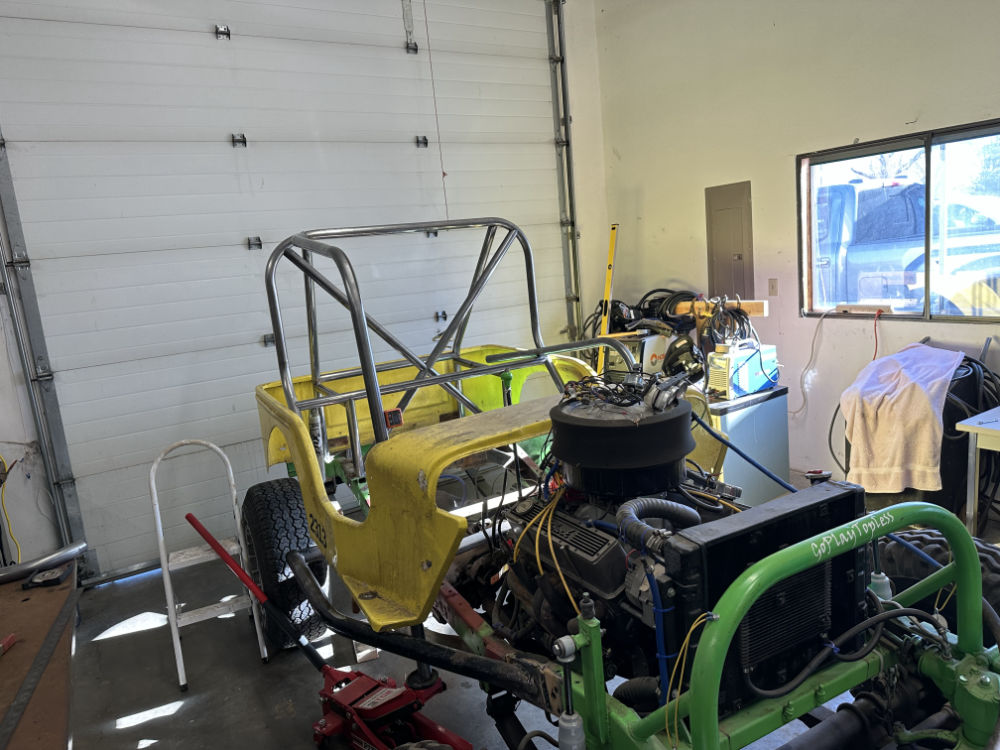
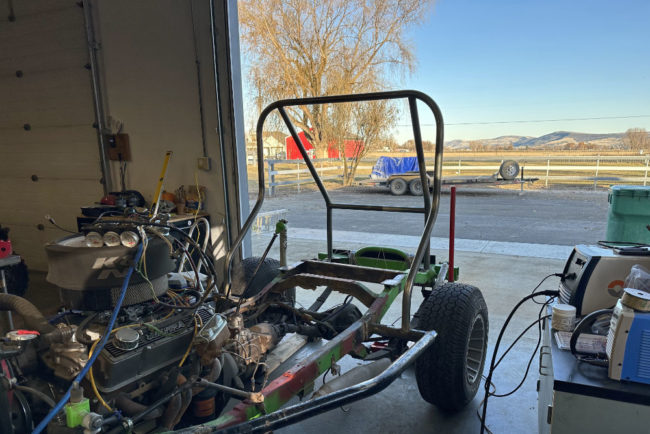
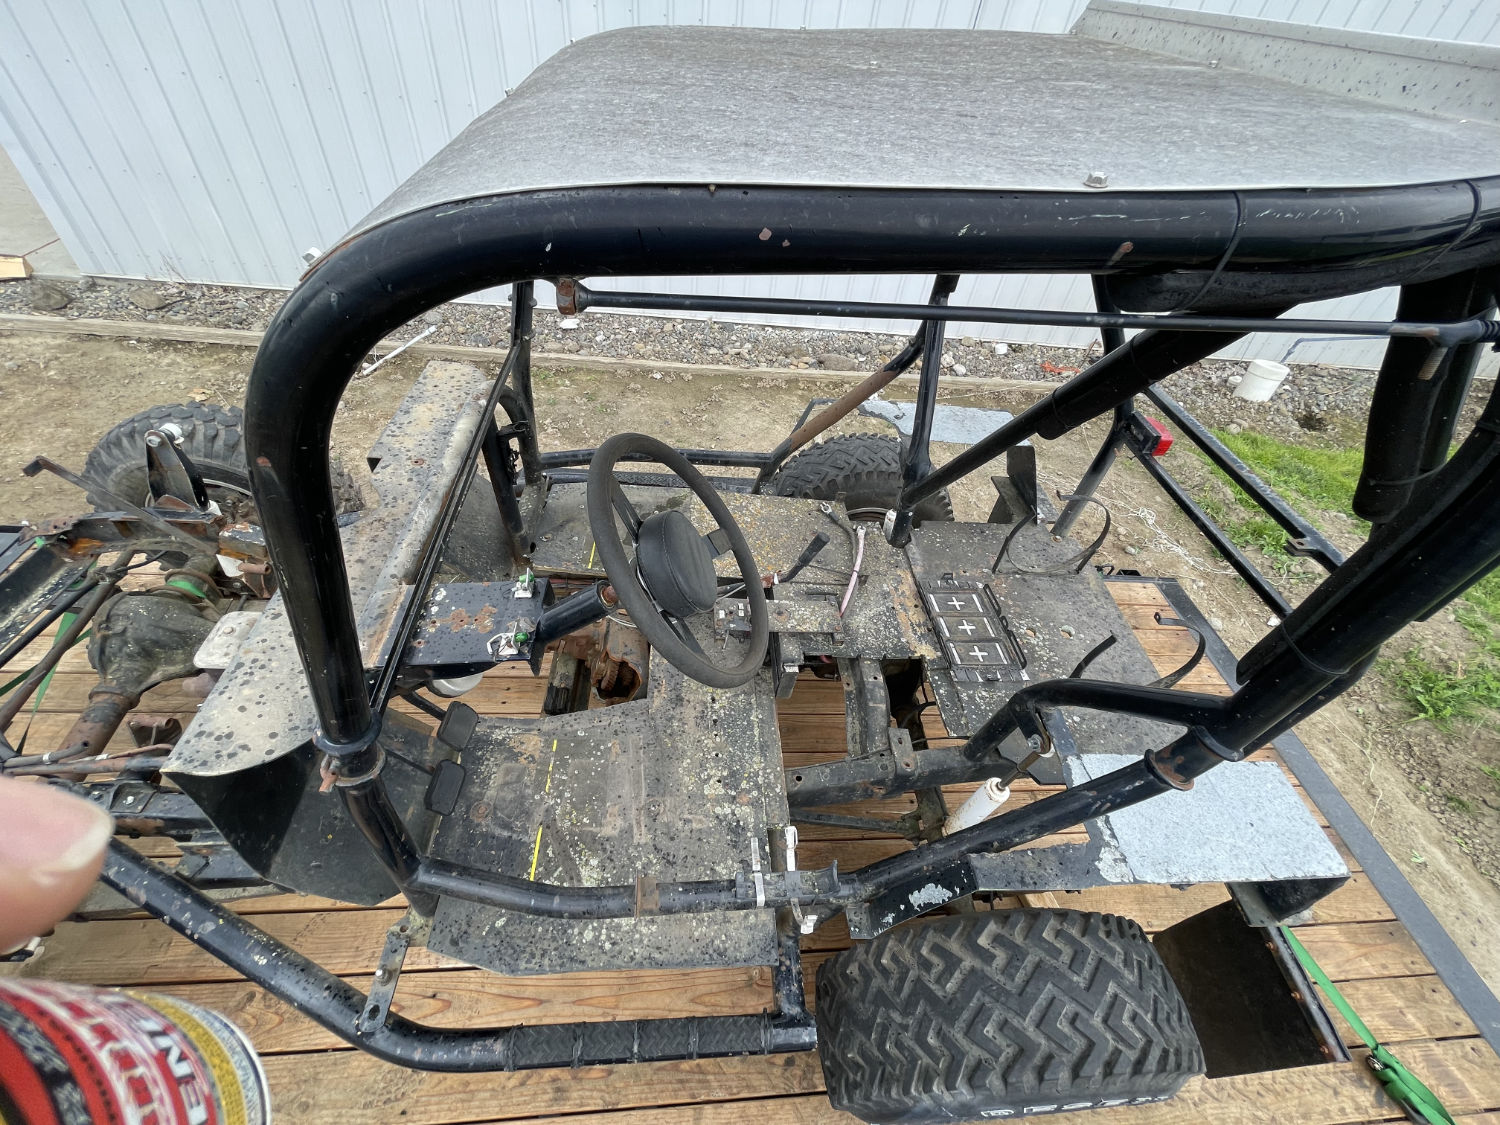
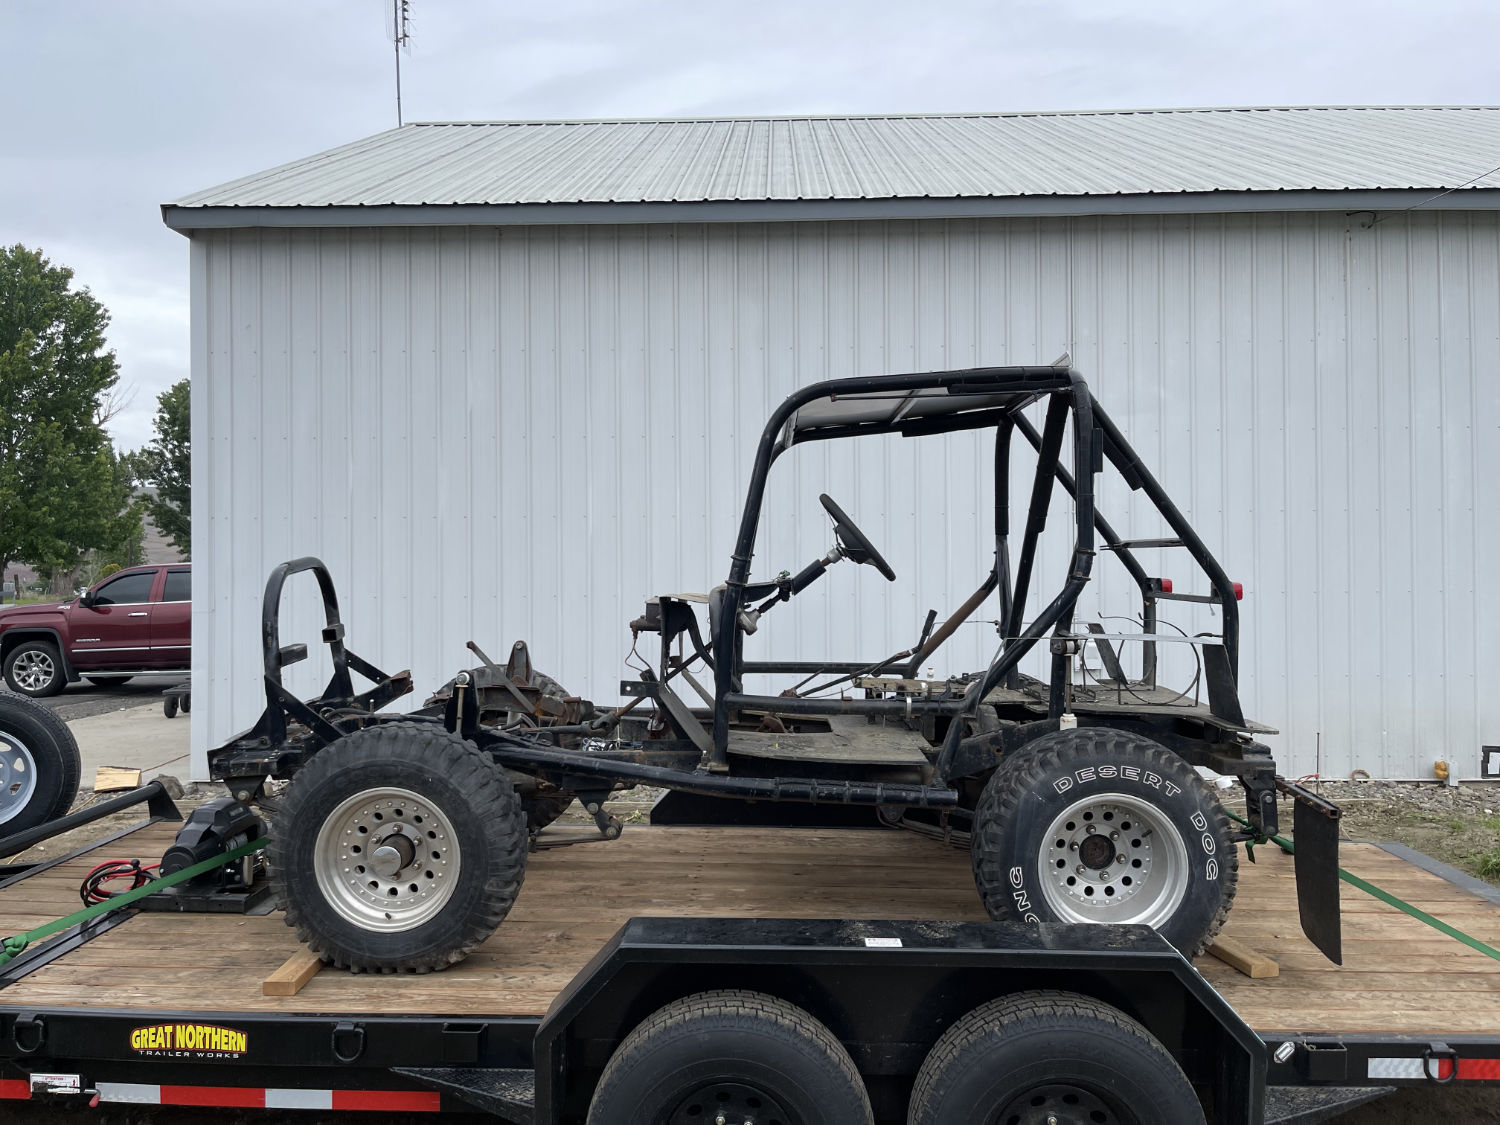
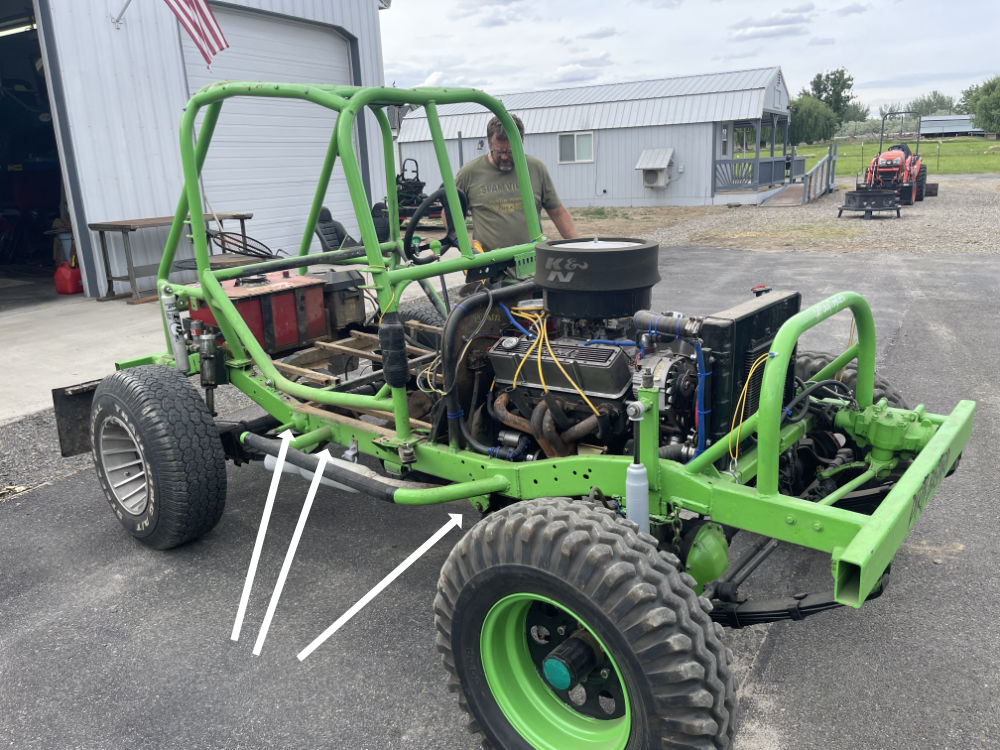
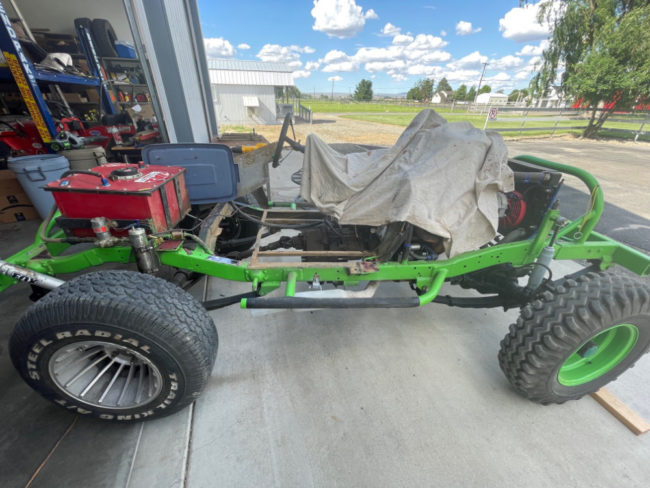
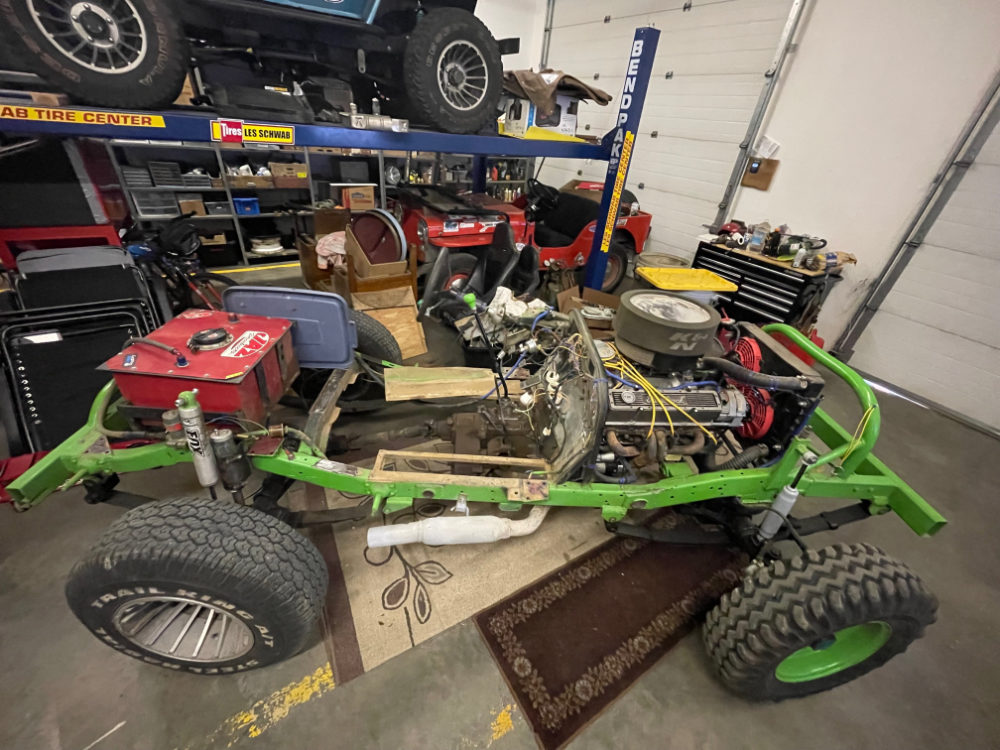
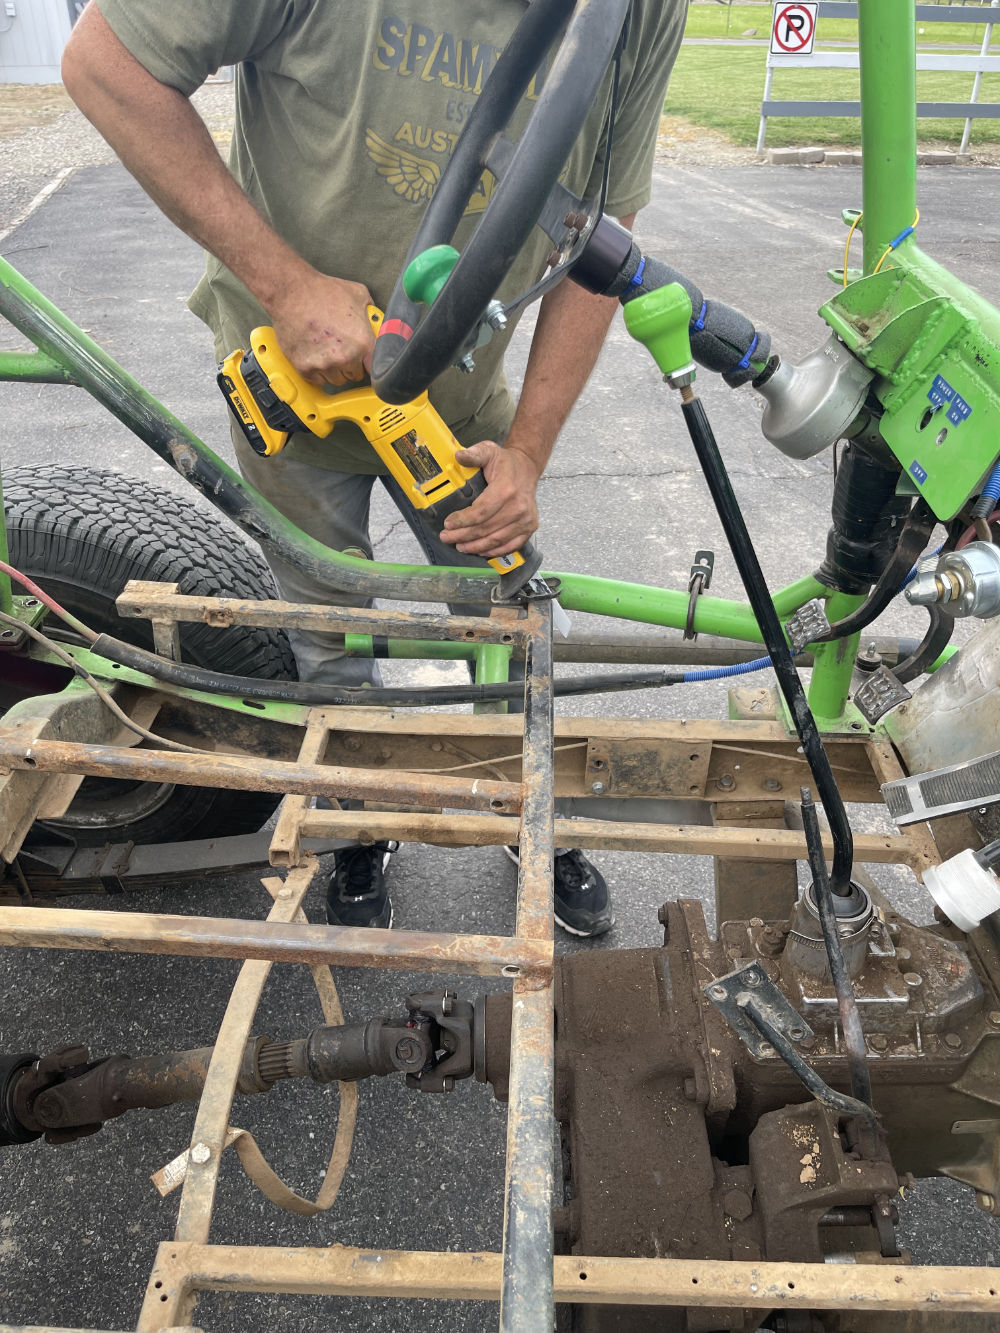
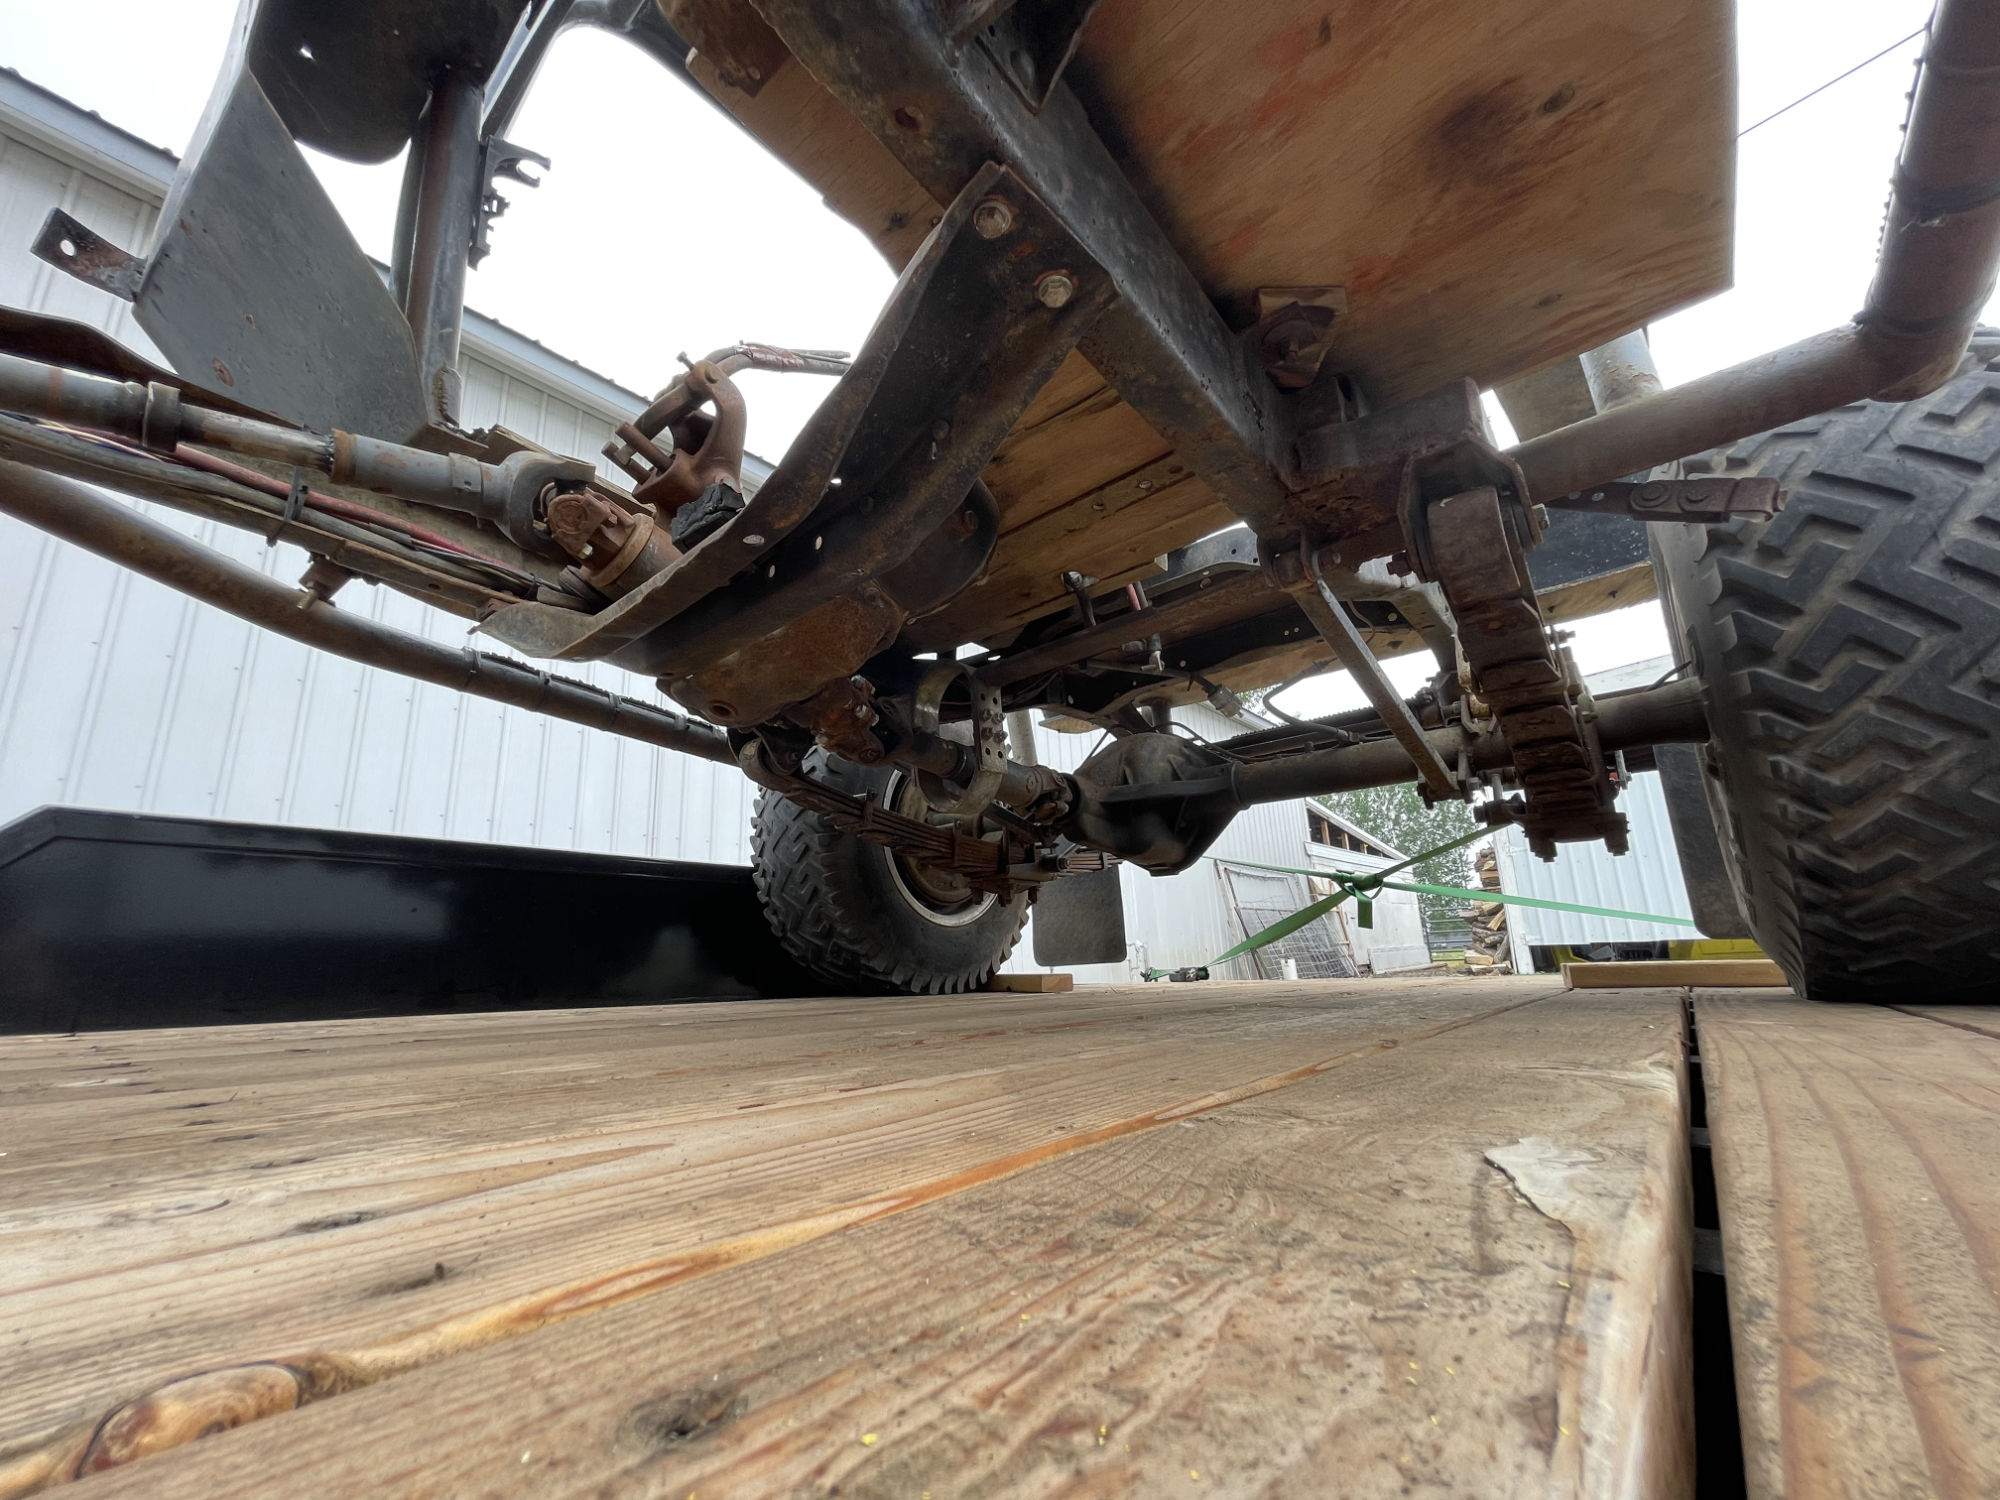
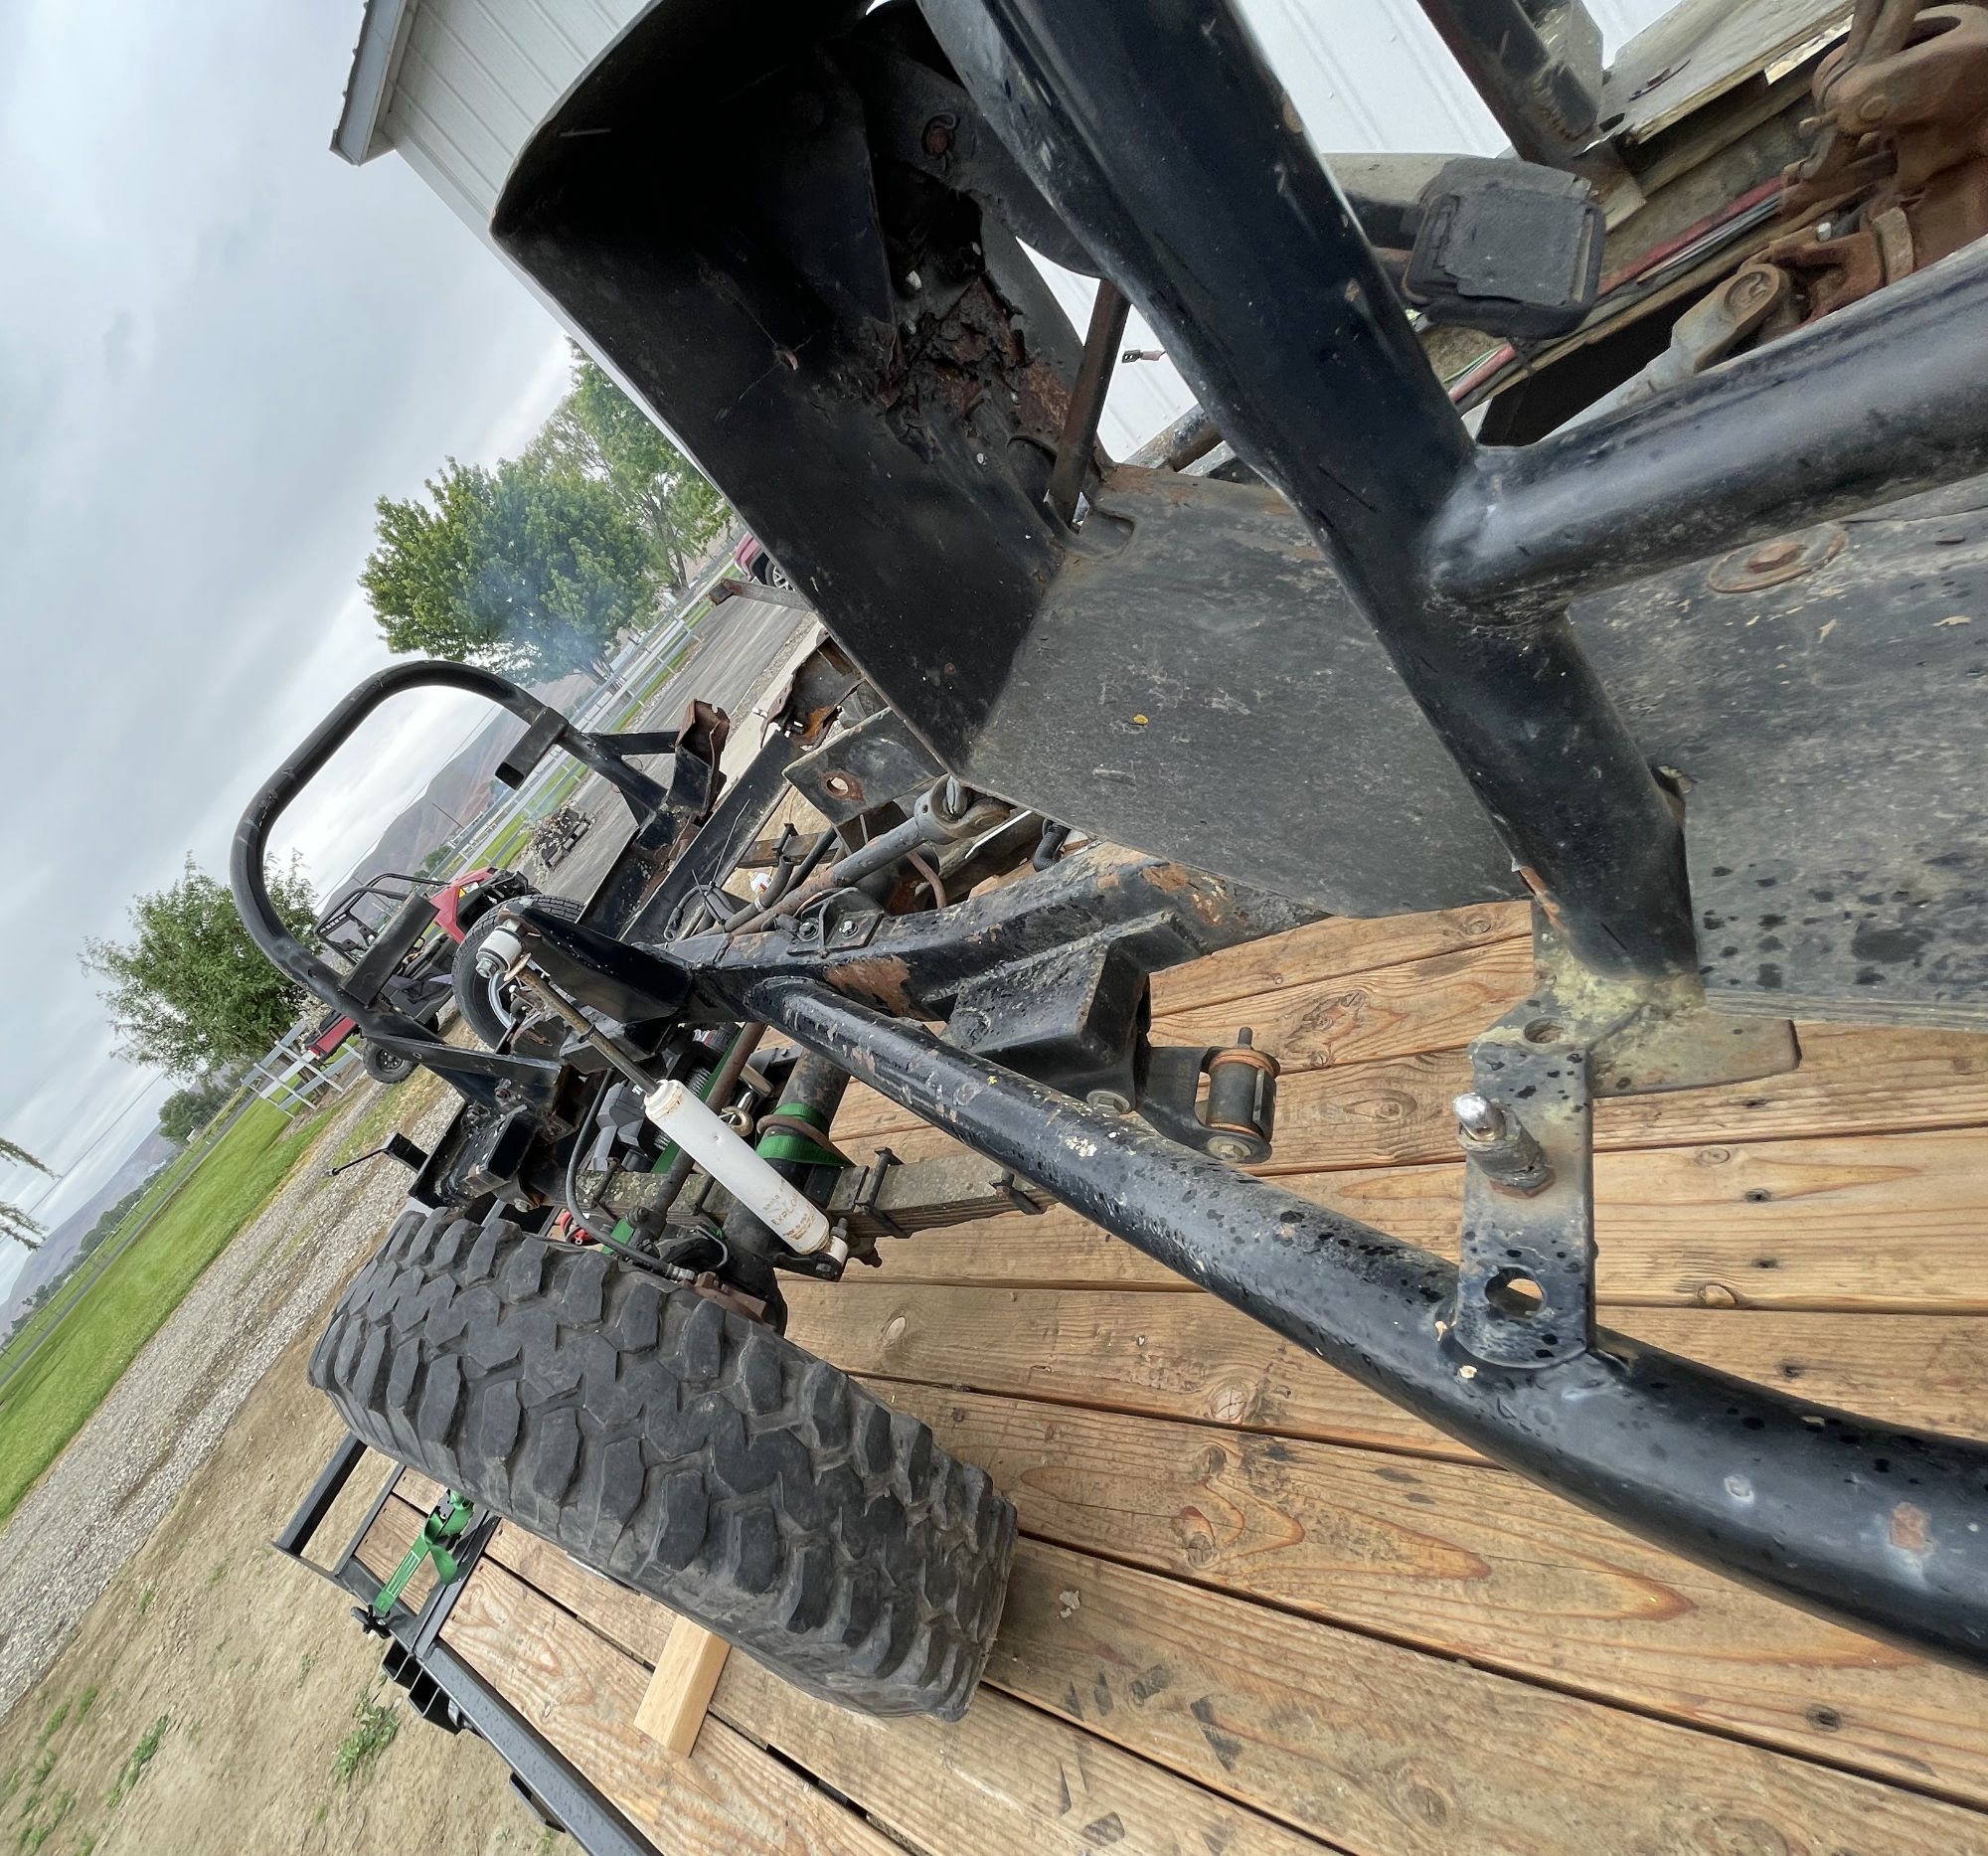
So, I finally returned to work on the racer, though the work was mostly grinding/cutting off the remaining pieces of the rear front spring holders and the former mounts of the side bars. With that done, I can now fit the new side bars.

Before:

2022-06-25-race-jeep-grinding-before

After:

2022-06-25-race-jeep-grinding

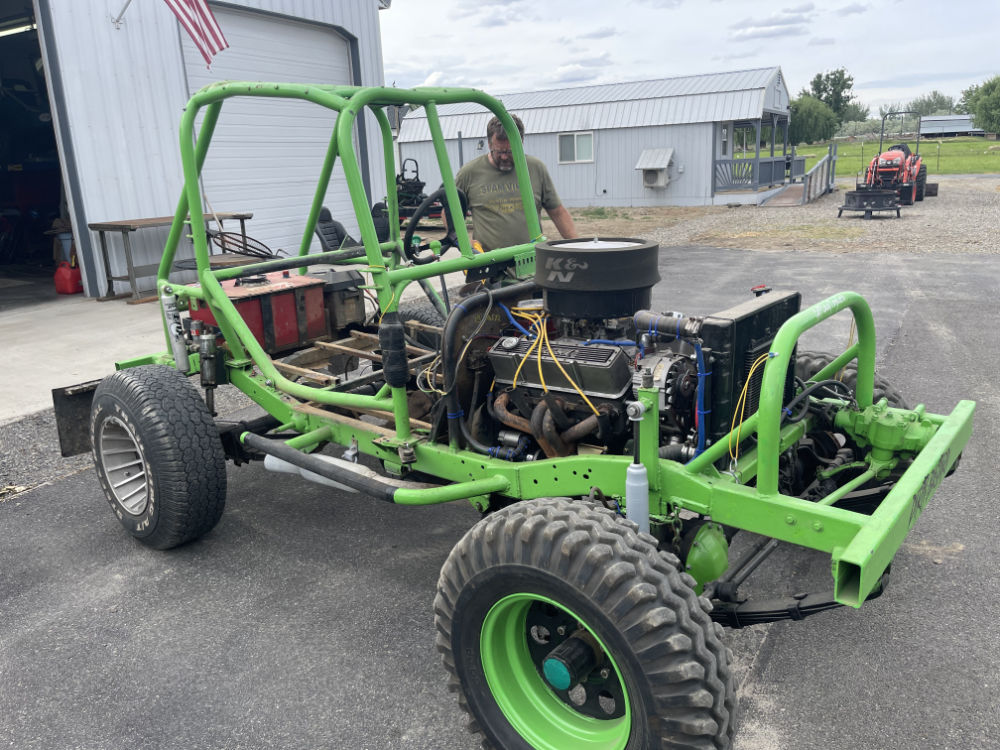
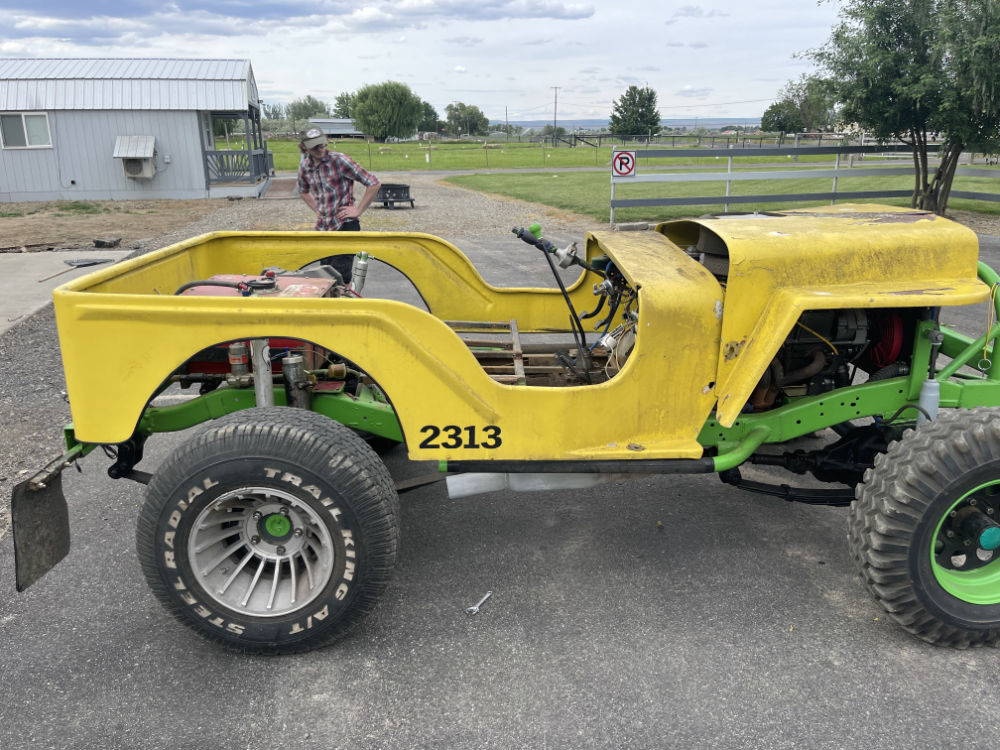
I’d prefer to take the whole thing apart to better clean up and paint the frame, but that can wait until winter. For now, I am focusing on functionality over style (though the green will be painted black before the body is installed).

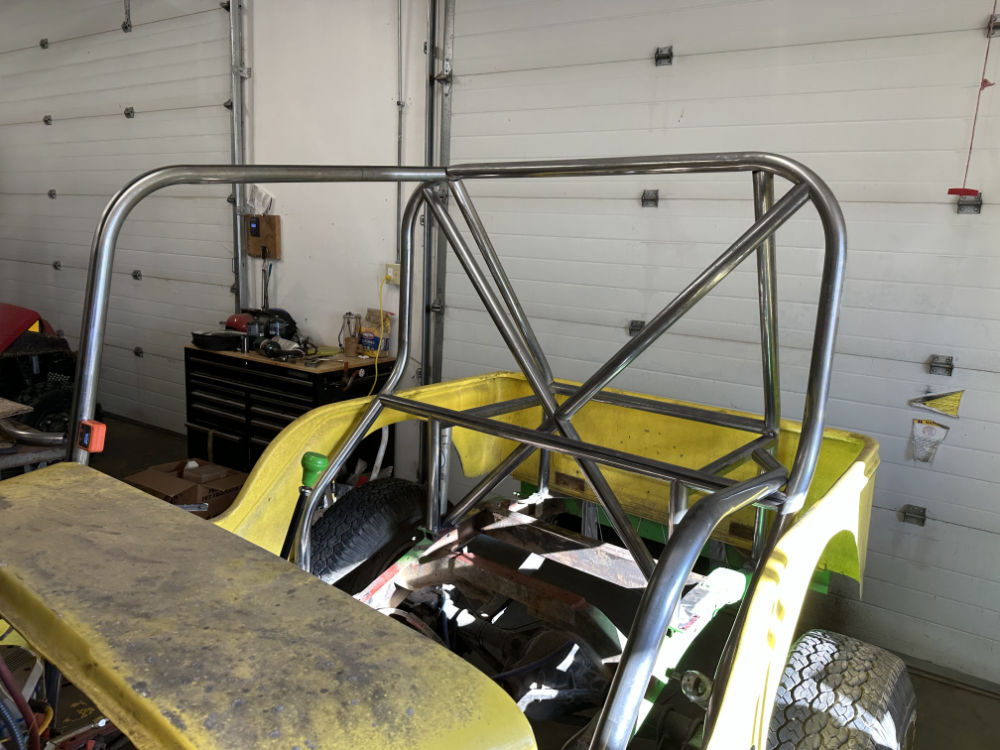
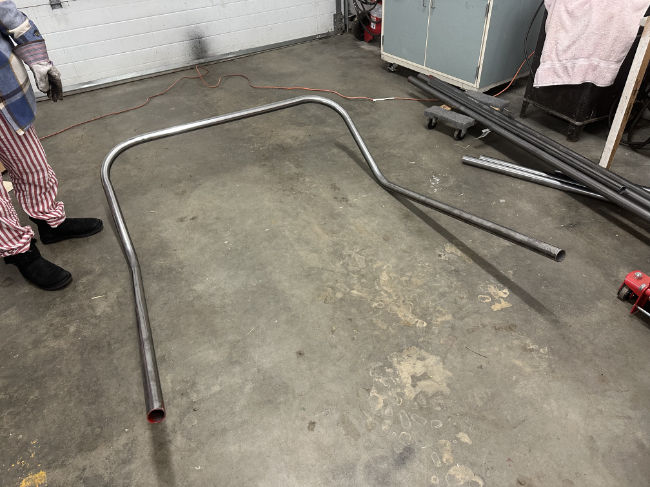
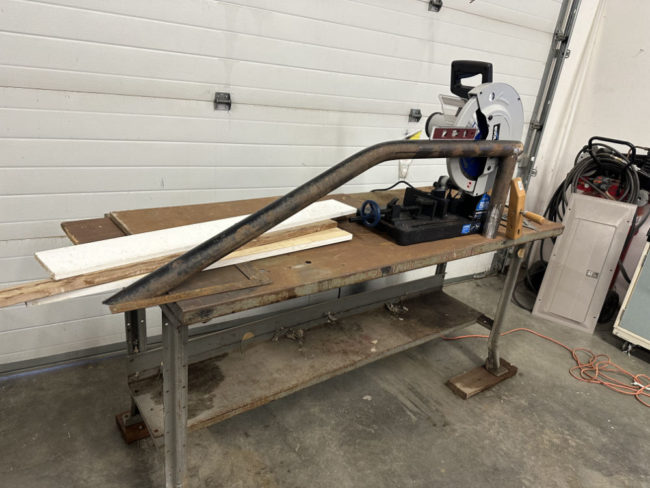
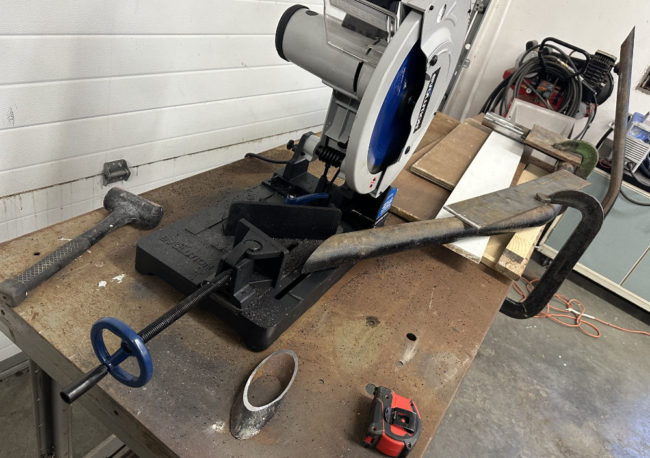
With the grinding done, I’m not far from being able to begin work on the roll cage. The new cage will be wider (for the wider Parkette body) and roomier (so I fit better). To build the cage I needed to get some new tools.

My plasma cutter arrived a few days ago, along with my tube bender (from Affordable Bender). I was going to build another bender, but I cannot locate printed copies of my bender plans nor can I find the password to the PDF I received from gotTrikes.com (locked PDF .. and no response from the gotTrikes website for a new password). So, after some research, I decided to take a chance on the AffordableBender, which as gotten pretty good reviews.

The thing I am awaiting now is my new MIG welder, which was supposed to arrive around June the 9th. It is now expected to arrive June 29th.

 
To Top

Progress on the Racer

• CATEGORIES: Features, Racing • TAGS: This site contains affiliate links for which I may be compensated.

On Sunday I turned 57. The years seem to be churning by all too quickly! To celebrate my aging, I spent more time removing parts off both the green chassis and the black chassis (no updated pics of that). While spending time thinking and measuring how to use as much of the existing green chassis and black chassis parts as I can, I made an unexpected discovery.

The green chassis is 5 inches wider than the black chassis!. The black chassis is a standard size (29.5″ from inner side to inner side) and seems to be most likely a CJ-3A chassis. The green chassis has the side mounts for the springs and was most likely a DJ-5 chassis as some point. For whatever reason, someone decided the frame rails should be widened, so all the crossmembers were removed but one (which was simply cut and patched using angle iron). The rest of the cross members are all rectangular tubing.

Given the widening, I don’t feel the need to outboard the rear springs at this time (perhaps a winter project). Unfortunately, the wider frame rails mean that I can’t just reuse the sway bar on the back of the black chassis (though I can reuse the mounts). I just need a sway bar that is 5″ wider than the one I have.

I am awaiting the delivery of an adapter so I can try out my new YesWelder plasma cutter to clean up more of the frame and am awaiting delivery of my new MIG Hobart MVP 210 Welder (I have a very very old arc welder that’s a big workhorse on heavy metal, but I wanted something for finer work). I had considered something as cheap as the YesWelder MIG (it is well-rated, but some folks complained about support problems) and something pricier as the Miller Multimatic 215 (which came highly recommended, but may be more than I need right now), but finally decided to get something more in between.

Anyway, here are a few pics of the progress. There’s nothing particularly exciting .. just the drudgery of cutting, grinding, and smoothing areas …

The seat mounting frame (1″x1″) tubing was uneven and not the best system in my opinion, so I cut and grounded the welds flat:

2022-06-06-parkette-racer-pics1-lores

With the seat mount frame gone, you can see the floor base (also 1″x1″ square tube). It’s not welded level (ugh), so it will likely go away as well.

2022-06-06-parkette-racer-pics2-lores

The side rails needed to be replaced as they were built for the narrower body, so off they came. I also plan to do a side bar similar to the way the other frame is done (more on that later).

Also gone are the mud flaps on the back (racing requirement), as they were welded onto the inside of the rear tubes (ugh). I will cover the rear tube with plates to hide the parts welded inside, then will cut off and mount the flap system used on the other frame, which is a long tube welded under the rear bumper with flap mounts that are bolted onto the tube (again, more on that later).

2022-06-06-parkette-racer-pics3-lores

We plan to have a garage/estate sale this weekend, so work will slow for a few days. At least I will finally be able to get rid of a bunch of junk that has filled the shop. As Ann has been finalizing stuff in the house, more items have ended up in the shop, so I will be happy to have this stuff gone and have more room to work.

Finally, I am awaiting a new fuel pump for Patterson (which has taken more than 2 weeks to get here). Once that is here, I will test things out once more, then put Patterson up for sale (essentially trading up for a different jeep, but I will announce that later).


To Top

Disassembled the Black & Green Race Jeep

• CATEGORIES: Builds, Features • TAGS: This site contains affiliate links for which I may be compensated.

A couple days ago I took disassembled some of the black and green race jeep. The cage for the narrow body is tool small to be useful for me. So, I will bend my own cage, built for the yellow parkette body, and outboard the rear springs while I am at it. I will also swap out the current swing pedals for the ones on the yellow racer. Hopefully, I can get this project done by August, in time for Summer Convention. We will see….

Here is a comparison of the Parkette full-size body vs. the narrow body. The difference is enough to give a person more room at the feet (more room for gas, brake and clutch). The narrow body would probably work better for an auto transmission with just a gas pedal and brake (I prefer to have enough room to the left of the clutch to help brace myself.

The narrow body seems better built, perhaps a slightly thicker fiberglass job. The Parkette needs some reinforcement in my opinion (which I will do).

2022-06-02-race-jeep-1

Her’s the narrow body racer without the body. Thankfully, unlike the other racer, this cage was bolted, rather than welded, to the frame.

2022-06-02-race-jeep-4

Well, the seat support piece was welded to the rollcage and to the frame, but it was easy to cut. I will have a different setup for the seats. Note the broken driveline ‘safety’ loop, that wasn’t very safe. I have a much stronger one from the other chassis.

2022-06-02-race-jeep-3

Here is a trail run of Parkette body on the racer.

2022-06-02-race-jeep-2Besides the new roll cage and the rear springs being out-boarded, the side bar will need replacing (it was built for the narrower body). A new firewall needs to be built (it will be wider, thanks to the wider parkette body, than the current one). The steering wheel needs to be angled differently and will have a tilt column (my preference).

Thankfully, the power train can remain in tact, as will the front spring setup. So, that saves a bunch of work.

 
To Top

Closer Look at “Little Miss Sunshine”

• CATEGORIES: Builds, Features • TAGS: , This site contains affiliate links for which I may be compensated.

Ann has dubbed the yellow racer “Little Miss Sunshine”, due to the yellow color. I don’t know if that’s the end-all name, but it’s a fine name for now.

Yesterday, I decided to remove the body so I could get a better look at the condition of the cage and the suspension.

Let’s take a look first at the rear suspension. The suspension in the rear consists of 2.5″ ranch springs that have been outboarded, to which a sway bar and arms have been added. In the pic below you can see the sway bar behind the axle and the arms in front, connected under the frame. The springs are outboarded six inches. For example, the spring holder in the back consists of a 2×4 rectangular tube, positioned horizontally (under which the spring holder is welded), was welded to a 2×3 tube positioned vertically, which was welded to a 1/4″ plate that was then welded to the frame.

The front of this rear setup is similar, only for additional strength, a 2.5″ tube was welded to the spring holder and frame, which is then welded to the side bar that sits outside and under the body.

2022-05-31-parkette-body-disassembled-suspension2

2022-05-31-parkette-body-disassembled-suspension5 2022-05-31-parkette-body-disassembled-suspension4 2022-05-31-parkette-body-disassembled-suspension3

Continue reading