How To Research Archives

How To

To Top

Builds: Rebuilding the front of a CJ-2A

• CATEGORIES: Builds, How To This site contains affiliate links for which I may be compensated.

One item I often see on older jeeps are cracks, patches and general ugliness along the front 2 feet of the frame rails.  Sometimes, patching simply isn’t enough and an amputation/replacement is in order.

Over at Pirate 4×4, there’s some great pics of a rebuild that were posted during 2009.  Below are just a few of the many pics posted regarding this surgery.  If you want/need to do this to your build, I suggest you visit the site and check it out.

View all the pics and information here.  Here are some excerpts:

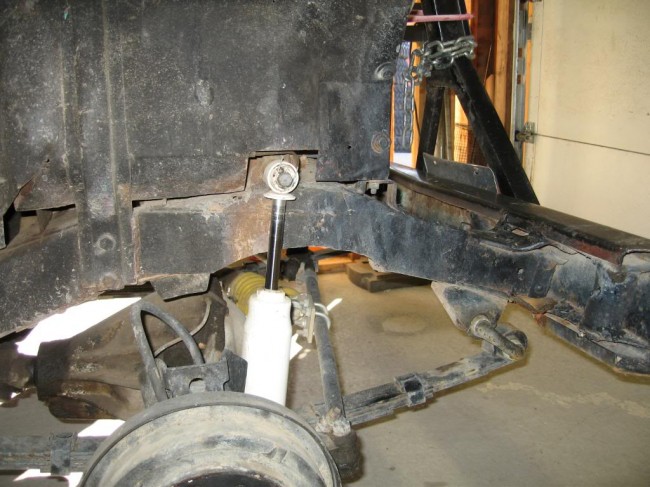
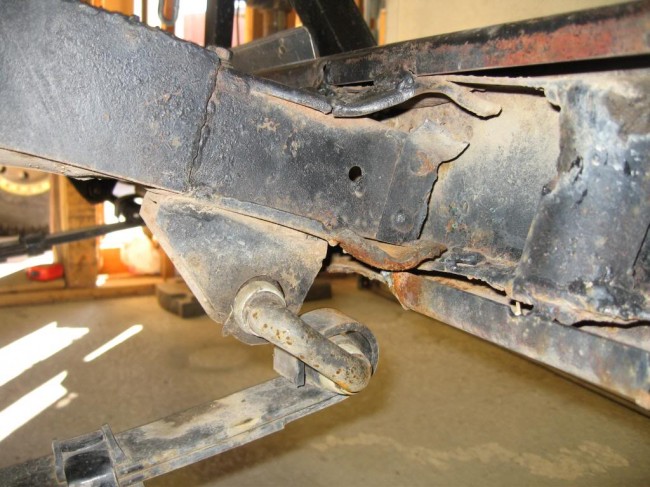
The Surgeon reports, “The front frame section was kinked I think from an incident with the tow bar hitting the ground at speed. It was like that when John bought it. The frame pointed at the ground and the front shackle lay flat against the front bumper meaning no suspension. I cut the fubared frame off and built a new section and front bumper out of 2×3 box tubing.”

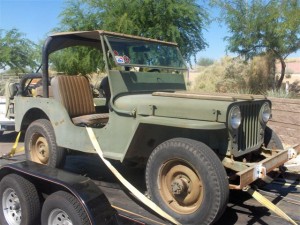
The patient prior to Surgery, a 1947 CJ-2A:

pic1

Here’s a closer look at the problem.  Note how the frame still trends downward rather than traveling horizontal.

pic3

And, a closer look:

pic2

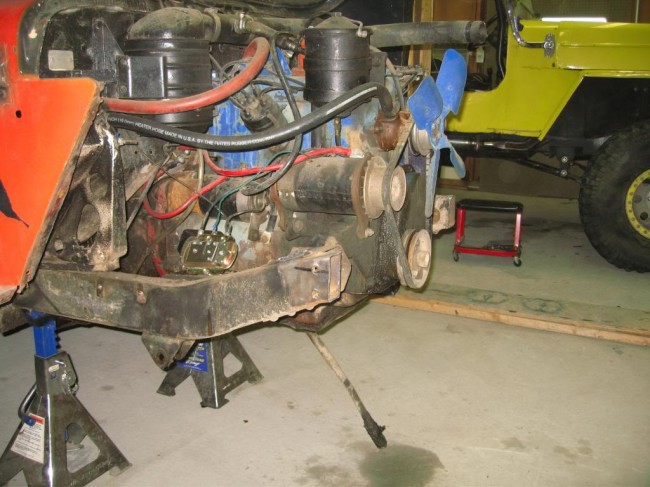
The front of the frame has been removed:

pic4

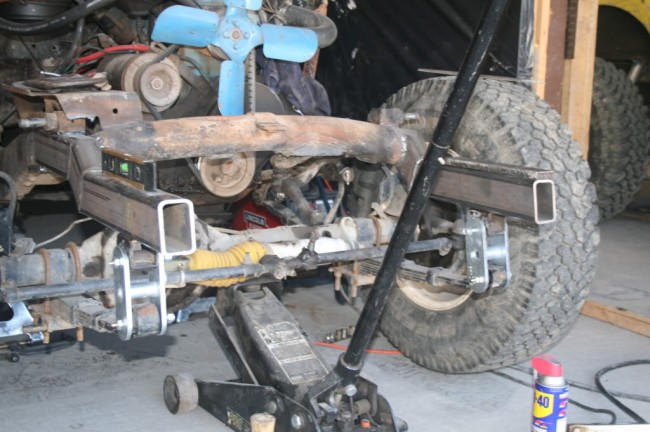
In this photo, you can see the new sections, build out of 2″ x 3″ square tubing that I would guess is 1/4″ thick.

pic5

And here’s another view:

pic6

You can view all the pics here

 
To Top

Leaks in a Transfer Case and a T-90

• CATEGORIES: How To This site contains affiliate links for which I may be compensated.

A reader sent me the following question.  He’s in the process of doing work on both :

What is the best way to stop leaks in a transfer case and t-90 transmision? Do you have a any tips?

My answer was the following:

I have found the most success using liquid gasket and following the directions (as I remember them) …
1. Clean the parts carefully
2. Put on the liquid gasket and put it on with bolts finger tight
3. Wait 24 hours
4.  Tighten to spec.

Anyone have additional thoughts, tricks or alternative ideas?

 
To Top

Upgrading / Changing brakes on older jeeps

• CATEGORIES: How To This site contains affiliate links for which I may be compensated.

Consider this a draft post that I’ll be expanding.

Jim mentioned in one of his emails to me that he once test drove (and purchased) a CJ-2A with stock brakes that stopped so fast, it surprised him.

cj2a-187Jim wrote, “The old guy I bought this sweet (seen to the right) all original 2A from laughed at me when I test drove it. I hit the brakes and about put my face through the glass, not normal for a Willys right? I asked what he had done, I had already looked underneath and knew it had stock drums. He laughed and said youll figure it out young man. Master cylinder was stock, brakes were stock but this thing would stop on a dime like no willys I had ever seen. Under the passenger side, I found a 1950s era huge vacumn powered brake booster, done so well it looked like a factory item, just brilliant!”

vacuum_brake_boosterThat got me looking around the internet and found a great page on the CJ-3B site about some power boosters that were offered as early accessories on CJ-3Bs. To the right is an image of a brake booster from the CJ-3B site.  These boosters were used along with the stock 9″ brakes.  There’s debate on the CJ-3B site about the wisdom of using the boosters with the 9″ brakes due to heat build up issues.   It’s an interesting solution if you only use your jeep occasionally, but probably not the best solution if you are going to use it often.

The JP website has a nice historical look at jeeps and brakes.  As 4x4wire.com puts it, “The stock brakes on a CJ-2A are frightening by modern day standards. They use a single cylinder master cylinder that has no redundancy and small drums all around. ”  So, there’s good reason to update those older brakes if you plan on seriously driving your older jeep.  There’s a variety of web page “how to’s” on upgrading brakes on older jeeps.   I’ll have to do some web searching to find the good ones, but here’s a draft list of options (and the options could vary depending on the front and back housing you run):

  1. STOCK BRAKES: Stick with your stock brakes, stock pedals and stock master cylinder.
  2. BOSTER PUMP: Add the booster pump.  Here’s info about the booster pump.
  3. SINGLE TO DUAL MASTER CYLINDER: Change your single master cylinder to a dual master cylinder
  4. 10″ BRAKES: Upgrade to 10″ brakes.  I had 10″ brakes on my Dana 44 that I pulled off a mail jeep.  I’m not sure where you find 10″ backing plates from the front.
  5. 11″  BRAKES: Put on 11″ brakes.  You have a couple options, you can use 11″ backing plates from a 60’s J-10 or redrill later-model backing plates (such at CJ-5 or CJ-7 backing plates from mid 70s).  Here’s a discussion of both options from the CJ-2A site.
  6. HYDRO-VAC: Install a Hydro-vac unit.  I ran across this as part of the sale of a jeep.  Apparently, these little devices were used on Trucks and Buses to improve hydraulic pressure. Here’s an image of one and more info.
  7. EARLY DISC BRAKES: Put on disc brakes from a mid 70’s chev truck. Here’s more information on it.  & Here’s a great overview from a Pirate 4×4 installation of disc brakes on a ’47 CJ-2A.
  8. LATER DISC BRAKES: Put disc brakes on the front from a late 70’s early 80’s CJ-5 or 7 (if you are running a dana 30).  Though the knuckles for a Dana 30 from a drum and a disc might look similar, they have slightly different outside bearings and slightly different knuckle shapes.  So, if you use a disc brake setup on a knuckle designed for drums, you’ll need to grind a little off the back of the knuckle.  Here’s one link on the subjectHere’s another Dana 30 drum to disc swap discussion.

Here’s some additional links

(Willys Brakes — Jeep Brakes — Upgrading Brakes)

 
To Top

Reader Question: Wiper Shafts Too Long … Options?

• CATEGORIES: Features, How To This site contains affiliate links for which I may be compensated.

A reader wrote to me asking for some input regarding some replacement electric windshield wipers.  I couldn’t answer his question and, in fact, I’ll have the same problem once I install my electric wipers.  Here’s what he wrote:

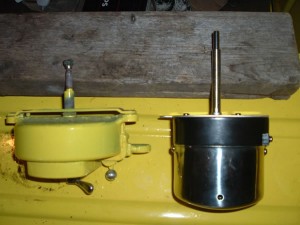
” I just bought the electric wiper conversion kit from Omix-ada, but the instructions are limited to the wiring diagram. As you can see from the picture, the shaft length would seem to cause a problem in a direct exchange. I have thought of cutting down the shafts(inner and outer) but wonder if I’m missing something easier. I have Googled the web to see if any one has discussed the conversion, so far no luck. I wonder if you or any of your readers has used these. Any help or comments would be appreciated. Thanks Phil”

So, if anyone has any ideas, we’d both appreciate it!

 
To Top

Wiring Harnesses — EZ2Wire

• CATEGORIES: Biscuit, How To This site contains affiliate links for which I may be compensated.

When I built my last jeep, I removed the wiring from a totaled Chevy Vega.  Using schematics I copied at a library, I was able to sort out the wires and hook everything together.  This time, I don’t have a wrecked Vega in the driveway.  Moreover, I didn’t want to spend the time at the junkyard pulling one out of a wrecked vehicle.  So, I made the decision to purchase a kit.

My first thought was to use a Painless Wiring Kit, but they seemed to be few and far between on Craigslist.  So, I figured that I’d have to buy a new wiring kit.  When I looked at the price of a new Painless Kit, I thought the price was a little high, so I turned to ebay to see what was available.

Continue reading